Thursday, July 31, 2014

"Sinful Sticky Buns" - July Artisan BOM

 YUMMY!!!!!! It feels good to be home and back in the kitchen. Our Bread of the month Challenge for July was Sticky Buns. I used the Sinful Sticky Buns recipe posted by Karen and they turned out amazing. The large pan is just regular carmel buns and the small pan of buns are filled with cranberry sauce. They came out very tasty.... 


Here is the recipe

For the Buns
2 packages active dry yeast
½ cup warm water
2 cups warm butter milk
½ cup unsalted butter
6 tablespoons sugar
2 teaspoons salt
2 eggs
6 ½ cups unbleached all purpose flour

CARMEL GLAZE
1 cup unsalted butter
3 cups brown sugar
½ cup light corn syrup
3 cups broken pecan or walnut pieces

The seductive flavor of caramel and sweet butter and the crunch of nuts make these buns the highlight of any breakfast or brunch

Dissolve the yeast in the warm water
In a large bowl, mix buttermilk, butter, and eggs until well blended. Add the yeast and 4 cups of the flour; mix vigorously. Add the rest of the flour to make a soft dough. Knead again until the dough is smooth and elastic. Cover it and let rise until it doubles in bulk.

Make the caramel glaze: Put butter, brown sugar and corn syrup (I also add a teaspoon cinnamon) in a saucepan.

Heat and stir until the butter is melted and the sugar is dissolved. Remove from heat and pour 1 cup of glaze into a small bowl and set aside. Sprinkle the remaining glaze over the bottom of a 12-inch Dutch oven or 9 x 12 baking dish and sprinkle nuts over the glaze. Roll out the dough into a rectangle and spread with the glaze and nuts. Roll up like a jellyroll from the wide side into a long tube. Cut into 1-½ pieces. Place each piece in the Dutch oven flat side down. Cover and let rise until puffy.

Bake in the Dutch oven for 25 – 30 minutes or in and oven at 350’ for 30 – 35 minutes. Invert the pan onto plate lined with wax paper. Serve warm

Yield: 12 large buns
Thursday, July 24, 2014

Garlic Twists


Ingredients
  • 1 1/8 cups water (70 to 80 degrees F)
  • 2 tablespoons of your new Infused Olive Oil
  • 3 tablespoons grated Parmesan cheese
  • 2 tablespoons sugar
  • 3 teaspoons garlic powder
  • 1 1/2 teaspoons salt
  • 3/4 teaspoon minced fresh basil
  • 3 cups bread flour
  • 2 teaspoons active dry yeast
  • 1 tablespoon butter or stick margarine, melted
Directions:
It really doesn't matter if you choose to make these by hand, with your bread mixer or in a bread machine. the steps are the same... place the first nine ingredients in order. Select dough setting (check dough after 5 minutes of mixing; add 1 to 2 tablespoons of water or flour if needed). When cycle is completed, turn dough onto a lightly floured surface. Divide into 20 portions. Shape each into a ball; roll each into a 9-in. rope. Place on greased baking sheets. Cover and let rise in a warm place for 40 minutes or until doubled. Bake at 350 degrees F for 18-22 minutes or until golden brown. Remove to wire racks. Brush warm breadsticks with butter.

    Saturday, July 19, 2014

    Can You Say CHOCOLATE & BACON!

    Well, J Noto Bakery combines both in a fantastic tasty way. Also, their sea salt caramels are the best that we have tried so far in St. Charles. Fun little bakery, filled with all sorts of yummy treats.

    Potato & Chive Dinner Rolls


     Ingredients:
     4 cups flour
     1 cup instant Potato flakes
     1 tbsp sugar
    4 tsp chives
    2 tsp salt
    2 pkg. active dry yeast
    2 cups milk
    1/2 cup sour cream
    2 eggs


    In a large bowl, combine 1 1/2 cups flour, potato flakes, sugar, chives, salt and yeast; blend well. In small saucepan, heat milk, sour cream until very warm (120* to 130*F) Add warm liquid and eggs to flour mixture.

    Blend at low speed until moistened; beat 3 mins at med. speed. Stir in an additional 3 to 3 1/2 cups flour until a stiff dough forms. Cover loosely with plastic wrap and cloth towel. Let rise in warm place (80 to 85*F) until light and doubled in size, about 45 to 55 mins.

    Generously grease 13x9-inch pan. On well-floured surface, toss dough until no longer sticky. Divide dough into 24 pieces; shape into balls. Place in prepared pan. Cover; let rise in warm place until light and doubled in size, about 30 to 35 mins.

    Heat oven to 375*F. Bake 25 to 35 mins or until golden brown. Immediately remove from pan; cool on wire rack. If desired, lightly dust tops of rolls with flour.

    Monday, July 7, 2014

    San Francisco Half & Half Loaves

    2 1/2 cups white flour
    2 1/4 cups whole wheat flour 
    (we use fresh ground red hard wheat)
    3 tablespoons white sugar
    2 1/2 teaspoons salt
    1  package active dry yeast
    1 cup warm milk
    2 tablespoons margarine, softened
    1 1/2 cups sourdough starter
    In a small sauce pan combine milk and butter, warm to 105 to 110 degrees and set aside. In a large bowl, combine 1 cup white flour, sugar, salt, and dry yeast. Add milk mixture and sour dough starter. Gradually mix in the rest of the flours, you may need more depending on your climate.
    Turn dough out onto a floured surface, and knead for 5 to 8 minutes. Place in a greased bowl, turn once to oil surface, and cover. Allow to rise for 1 hour, or until doubled in volume. Punch down, and let rest 15 minutes. Shape into loaves. Place on a greased baking pan. Allow to rise for 1 hour, or until doubled.
    Brush egg wash (1 large egg & 1 tablespoon warm water, mixed together) over tops of loaves. Bake at 375 degrees F (190 degrees C) for 30 minutes, or till done.


    Saturday, July 5, 2014

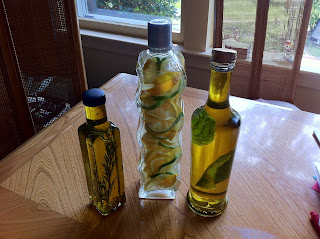
    Infused oils & Vinegars

            Every Summer when we start getting ready to for grilling and BBQs, we like to make our own Infused Oils and flavored vinegars to use in our recipes as marinades, sauces and dressings. They are really easy to make and only require a little time in the pantry. There are a few do's and don'ts that you want to remember when putting these yummy tasting items together. Infused oils are so easy to make. You can either use extra virgin olive oil for a stronger oil flavor or you can use canola oil if you only want to taste the herbs and not the oil. This is a personal preference.  We prefer using olive oils.

    DO's....
    • use only clean and sterilized bottles
    • use only clean and fresh herbs, spices and fruits
    • remember most only have abut a week shelf life 
    • they do make great summer and holiday house warming gift 
    • You may want to check with your local Extension Service Representative and ask what the current recommendations are for safely making and storing flavored oils in your areas. 
    • Do label and date all bottles and rotate often
    Don'ts....  
    •  Leave any water in the bottles because this could allow bacterial growth.  
    • being careful to avoid over-packing the bottles
     
     Infused oils are so easy to make. You can either use extra virgin olive oil for a stronger oil flavor or you can use canola oil if you only want to taste the herbs and not the oil. This is a personal preference.  We prefer using olive oils.
    • Wash and air dry your choice of herbs. Place them in a clean decorative glass container, cover with warmed oil, and seal tightly. Leave in a cool, dark place to infuse about a week, depending on if you use fresh or dried herbs and spices they will last up to two weeks in the refrigerator. Remember the more water in your herbs and spices, the lower the shelf life and the higher your risk is for bacterial growth.
    • Taste. If not strong enough, add more fresh herbs and let stand another week. You can either strain the oil or leave the herbs in. If you do not strain the herbs out, the flavor will become stronger as it stands, so keep that in mind.  
    • Herb Suggestions: rosemary, thyme, basil, tarragon, summer savory, oregano, cilantro, marjoram, chervil, chives, dill, mint, parsley, bay leaf.
    • Spice Suggestions: cardamom, star anise, juniper, coriander seeds, nutmeg, cinnamon, cumin, cloves. 
    • Our Favorite: 2 cups olive oil, 1 teaspoon coarsely ground black pepper,1 tablespoon chopped fresh basil,1/2 teaspoon coarse sea salt, 1 pinch crushed red pepper. In a medium bowl or decorative bottle, mix together olive oil, whole black pepper, basil, coarse sea salt and red pepper. Cover and Allow it to sit approximately 1 hour before serving. We use this one as a dipping sauce for Italian breads.
    Flavored vinegars add an extra kick to marinades, sauces, and dressings. If you grow your own herbs, this is a great way to use up any excess before the growing season is over. Most flavored Vinegars only have a shelve life up up to four months.
    •  Use clean sanitized jars. Immerse jars/bottles in boiling water for 10 minutes.
    • Heat the vinegar to just below boiling.
    • Place desired herb(s) in the sanitized bottles or jars and add hot vinegar. Tightly cap and store in a cool clean place for three to four weeks.
    •  Once the flavor is developed, strain the vinegar one or more times using damp cheesecloth or coffee filters until the vinegar is no longer cloudy. 
    • Pour the strained vinegar into a clean sterilized jar/bottle adding a sprig or two of fresh herbs (or berries) that have been sanitized as above. 
    • Seal and store in the refrigerator. For best flavor, use within three or four months.
    • OUR FAVORITE: Citrus Vinegar
      Makes 4 cups
      2 cups mixed citrus fruits (we use thin sliced oranges, lemons and limes)
      4 cups white vinegar
      Add the sliced frriut to vinegar. Heat gently for 15 minutes to infuse the flavor and color, but be very careful not to boil the mixture. pour into pretty bottles. Use a sliver of bamboo or a long toothpick and thread some slices into a decorative position. Cork and seal bottle. Label.. We use this vinegar for to make a refreshing salad dressing or is some fish dishes. Other fruits such as strawberries, raspberries, blackberries, blueberries etc can be substituted for a different flavour using this same method.
     

    Friday, July 4, 2014

    Celebrating 4th of July...

    The 4th of July has always been a big holiday for my family, It usually started off with a BANG! Literally... there is a tradition in my home town that at five o'clock in the morning the guys would drive around town setting off small sticks of dynamite in remembrance of the "bombs bursting in air" and my family was always lucky enough to get one right in the field beside our house. Everybody wanted to make sure my dad was up to cook the biscuits for breakfast. He was consisdered the best Sour Dough scone and biscuit maker next to Lloyd Stoker, who was the old cowboy who taught my dad all his tricks. In turn, I grew up learning the trade from my dad and I have tried to pass on all the tricks to a couple of my boys. The 4th of July has just never been the same since my dad passed away... This year my Home Town of Circleville, Utah is Celebrating 150 in the making and I wish I could be there to make everyone some biscuits! My heart is with you all today... Hat's of to all the good ole' cowboys!

    Ingredients

    • 4 cups Sourdough Starter, recipe below (start 2-4 days before actual baking day)
    • 1 teaspoon active dry yeast
    • 1/3 cup plus 2 tablespoons sugar
    • 2 1/2 teaspoons salt
    • 3 heaping teaspoons baking powder
    • 1/2 heaping teaspoon baking soda
    • 3/4 cup vegetable oil
    • 6 cups all-purpose flour, plus more for dusting
    • 1/4 cup melted butter (1/2 stick)
    • Special Equipment: 1 (16-inch) Dutch oven

    Directions

    Prepare the Sourdough Starter the night before. Preheat the oven to 400 degrees F.
    Sprinkle yeast in the starter and stir. Add sugar and stir. Add salt and stir. Add baking powder and baking soda and stir. Add oil and then gradually add flour, stirring well after each addition. Place dough on a floured board and sprinkle more flour on top of dough. Flatten dough by hand to about 1/2-inch thickness and then cut with a biscuit cutter. Spray a 16-inch Dutch oven with non-stick cooking spray and then add a little oil to the bottom of the Dutch oven. Place biscuits in Dutch oven, being careful not to overcrowd them. Top with melted butter and set aside to let rise until wrinkles are gone, about 1 hour. Bake, with coals on the lid, for 25 or 30 minutes or until golden brown.

    Sourdough Starter:
    2 (1/4-ounce) packages active dry yeast
    8 cups warm water (105 to 115 degrees F)
    2/3 cup sugar
    8 cups all-purpose flour, sifted
    1 raw potato

    Dissolve yeast in warm water and whisk to combine. Add sugar and whisk until sugar dissolves. Add sifted flour, 2 cups at a time, whisking after each addition to combine. Peel, wash, and cut the raw potato into quarters; add potato to the flour mixture. Place starter in a large, deep bowl, cover it with a towel, and let rest in a warm place overnight. The starter should be made ahead of time, even 3 to 4 days ahead.

    Thursday, July 3, 2014

    Green Goddess Goodness

    Several years ago, the Restaurant "Ruby Tuesday's" served an "Avocado Ranch" salad dressing on their salad bar. It was so yummmmmy! Anyway, I have been craving it and after describing it to my mom, she said it sounded very similar to the old salad dressing known as "Green Goddess". So after searching and sampling several very tasty, but not quit right dressing recipes, we have finally came up with our own that we love...

    Recipe:
    1 avocado (peeled and pitted)
    1/2 cup sour cream
    1/2 cup mayonnaise
    1/2 teaspoon minced dried garlic
    1 teaspoon minced dried onion
    1 tablespoon lemon juice
    1/4 cup heavy cream
    1/2 teaspoon Worcestershire sauce instead of anchovies
    (we don't care for anchovies flavor in this recipe)
    salt & pepper to taste

    Place all the ingredients in a blender and blend until totally liquified. Chill for a least two hours before serving. Also this recipe works for our "Thrifty Thursday" because all the items should be in your pantry... :)
     

    Tuesday, July 1, 2014

    "Tuesday's with Dorie" - Leaf Shaped Fougasse

    Our "Tuesday's with Dorie" challenge today fit right in with our bread making plans.  We love this recipe and it makes a pretty looking basket full to be served with your favorite pasta dish. If you are interested in the recipe, check out the cookbook "Baking with Julia" by Dorie Greenspan, pages 146/147 and bake your own Fougasse.