As we stop and reflect back on all the many blessings that our bountiful Pantry has welcomed us with during the past year, we look forward to restocking the pantry full of goals, ideas and recipes for 2014. We have gained a sense of order and budget wise menus, packed with lots of nutritional choices for a awesome guide to a healthier lifestyle.We would like this to become a over interactive blogsite where all FOODIES can come and enjoy hanging out!
This next year we would like to offer the following Daily Guide here at the Pantry...
MONDAY MADE-OVER ---- (Where we take a recipe and do a complete makeover to gear it for a healthy life choice, without skimping on the taste of the traditional treat.)
TUESDAY'S WITH DORI ---- (Where we follow the suggest plan of spending the time with Tori Greenspan and Friends, website: "Tuesday's with Dorie")
WEDNESDAY's Words of Wisdom--- (This will be a new feature where we will post a picture of a food item and the first person who posts in the comments what it is and what you would cook with it, will win a prize from the Party... This is a bit of fun to help us all expand our food Knowledge.... Everyone is invited to play!)
THRIFTY THURSDAYS ---- (Where we combine "Blog Hoppers" (2nd & 4th) and the "Five Dollar Dinner" Challenges (1st & 3rd), to help us stay on budget and freshen up our cooking skills.
FRUITFUL FRIDAY ---- (Where we will be featuring Favorite Family recipes and Home Storage Ideas that have helped to fill our bountiful Pantry)
SUPER SATURDAY ---- (Where we will be posting educational and starter recipes, along with some cooking 101 skills sets to help not only the basic cook but even the seasoned chef.)
SUNDAY ---- For those of you who are new to our site... Reminder: The Pantry is dark on Sundays!
We are God fearing, church going people who, enjoy a day full of sabbath blessings, family time and everyday, over-the-counter snacks !!!!!!

Tuesday, December 31, 2013
Tuesday, December 3, 2013
"Tuesday's with Dorie"... Making Challah
I had so much fun learning how to make traditional challah yesterday... So much love, respect and culture involved.
DOUGH INGREDIENTS
- 1 1/2 cups lukewarm water, divided
- 1 packet active dry yeast
- 1 tsp sugar
- 1 egg
- 3 egg yolks
- 1/3 cup honey
- 2 tbsp canola oil
- 2 tsp salt
- 4 1/2 to 6 cups flour
EGG WASH INGREDIENTS
- 1 egg
- 1 tbsp cold water
- 1/2 tsp salt
OPTIONAL INGREDIENTS
- Raisins, chocolate chips (1 ½ cups of either)
OPTIONAL TOPPINGS
- Sesame seeds, poppy seeds, kosher salt
YOU WILL ALSO NEED
- Large mixing bowl, whisk, kitchen towel, cookie sheet, parchment paper, plastic wrap, pastry brush, timer
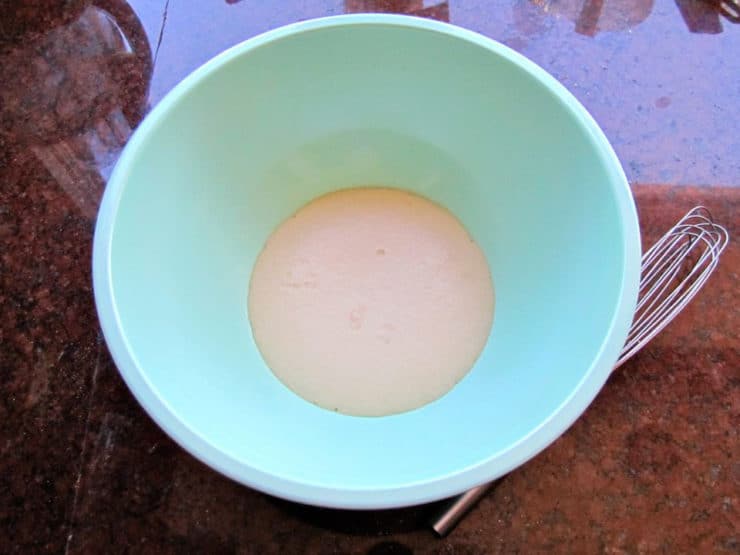
- Pour ¼ cup of the lukewarm water (about 110 degrees) into a large mixing bowl. Add 1 packet of Active Dry Yeast and 1 tsp of sugar to the bowl, stir to dissolve. Wait 10 minutes. The yeast should have activated, meaning it will look expanded and foamy. If it doesn’t, your yeast may have expired, which means your bread won’t rise—go buy some fresh yeast!
- Once your yeast has activated, add remaining 1 ¼ cup lukewarm water to the bowl along with the egg, egg yolks, honey, canola oil and salt. Use a whisk to thoroughly blend the ingredients together.
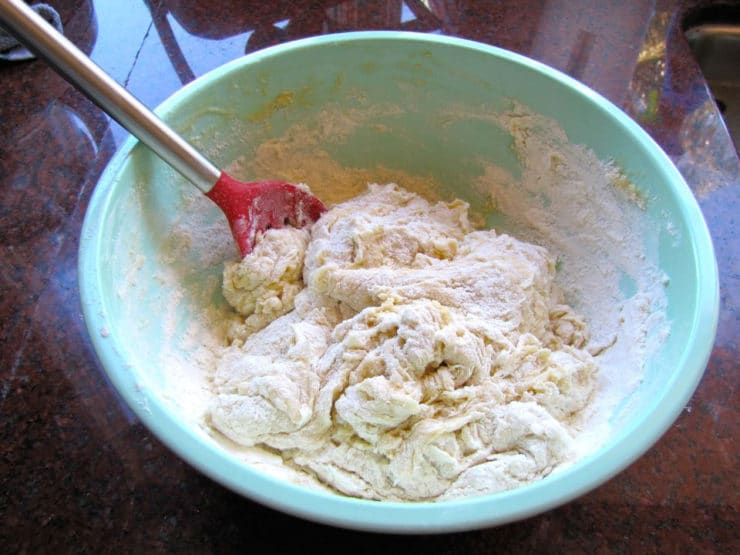
- Begin adding the flour to the bowl by half-cupfuls, stirring with a large spoon each time flour is added. When mixture becomes too thick to stir, use your hands to knead.
- Continue to add flour and knead the dough until it’s smooth, elastic, and not sticky. The amount of flour you will need to achieve this texture varies—only add flour until the dough feels pliable and “right.” If you plan to add raisins or chocolate chips to the challah, incorporate into the dough as you knead.
- Place a saucepan full of water on the stove to boil.
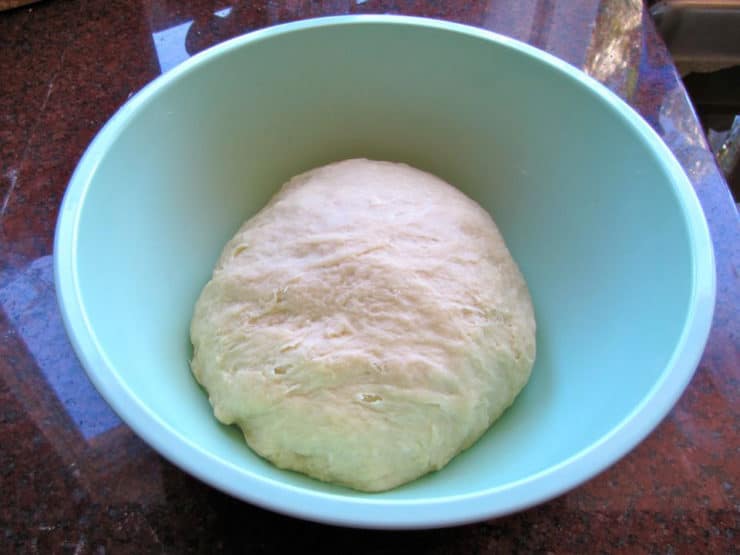
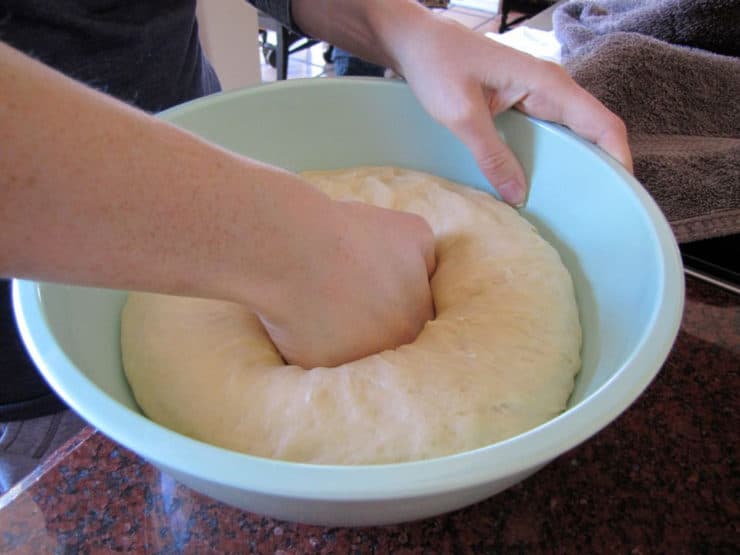
- Meanwhile, remove the dough from your mixing bowl and wash out the bowl. Grease the bowl with canola oil. Push the dough back into the bottom of the bowl, then flip it over so that both sides are slightly moistened by the oil.
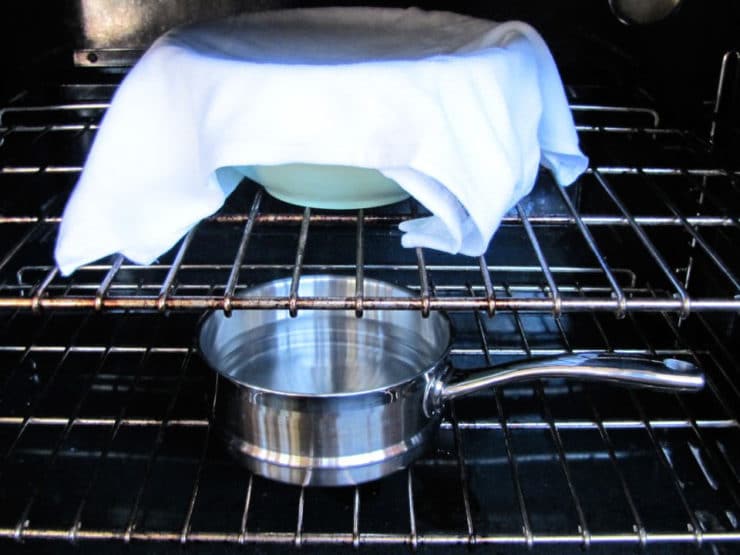
- Cover the bowl with a clean, damp kitchen towel. Place the bowl of dough on the middle rack of your oven. Take the saucepan full of boiling water and place it below the rack where your dough sits. Close the oven, but do not turn it on. The pan of hot water will create a warm, moist environment for your dough to rise. Let the dough rise for 1 hour.
- Take the dough bowl out and punch it down several times to remove air pockets. Place it back inside the oven and let it rise for 1 hour longer.
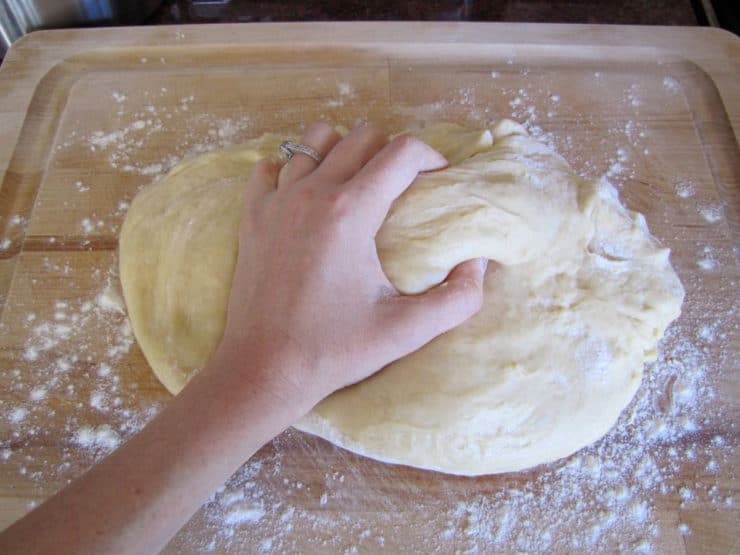
- Take the dough out of the oven. Flour a smooth surface like a cutting board. Punch the dough down into the bowl a few times, then turn the dough out onto the floured surface. Knead for a few minutes, adding flour as needed to keep the dough from feeling sticky.
- Now your dough is ready to braid. If you plan to separate and bless the challah, do it prior to braiding. Click here to learn how to braid challah.
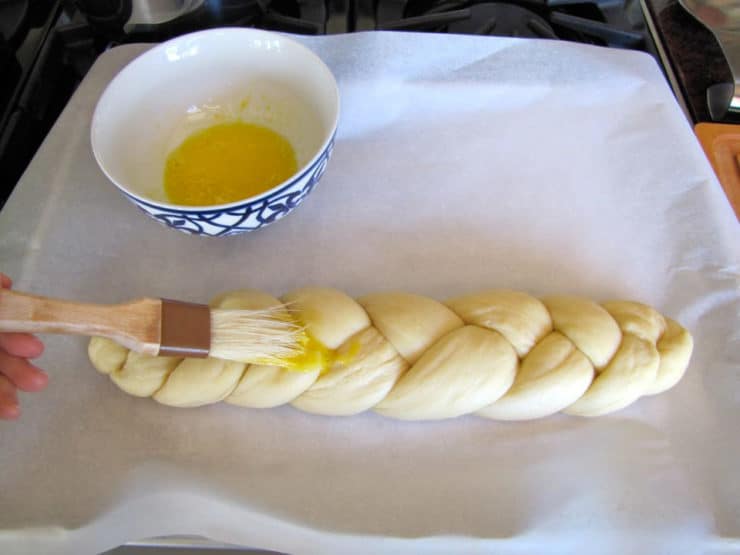
- After you’ve braided your challah, place it on a cookie sheet lined with parchment paper (this will catch any spills from your egg wash and keep your challah from sticking to the cookie sheet).
- Note: I usually only put a single challah braid on a cookie sheet, since they tend to expand a lot when baking.
- Prepare your egg wash by beating the egg, salt and water till smooth. Use a pastry brush to brush a thin layer of the mixture onto the visible surface of your challah. Reserve the leftover egg wash.
- Let the braid rise 30 to 45 minutes longer. You’ll know the dough is ready to bake when you press your finger into the dough and the indentation stays, rather than bouncing back.
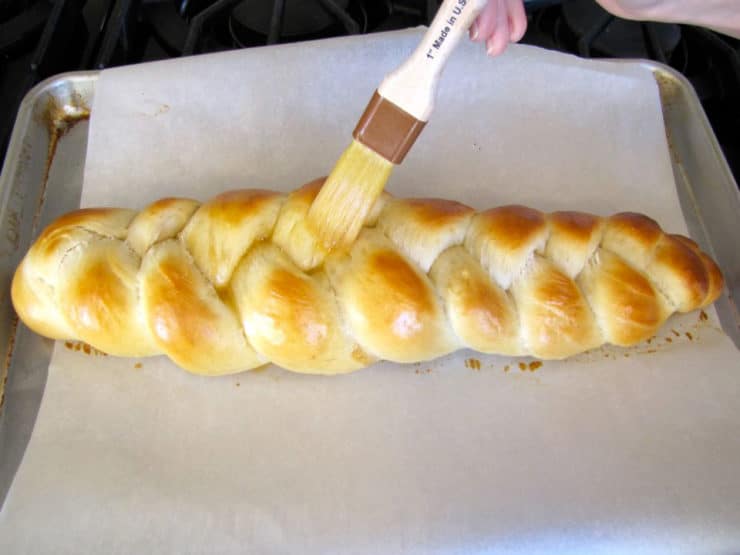
- Heat oven to 350 degrees F. The challah needs to bake for about 40 minutes total, but to get the best result the baking should be done in stages. First, set your timer to 20 minutes and put your challah in the oven.
- After 20 minutes, take the challah out of the oven and coat the center of the braid with another thin layer of egg wash. This area tends to expand during baking, exposing areas that will turn white unless they are coated with egg wash.
- Turn the tray around, so the opposite side is facing front, and put the tray back into the oven. Turning the tray helps your challah brown evenly—the back of the oven is usually hotter than the front.
- The challah will need to bake for about 20 minutes longer. For this last part of the baking process, keep an eye on your challah—it may be browning faster than it’s baking. Once the challah is browned to your liking, take the tray out and tent it with foil, then place it back in the oven. Remove the foil for the last 2 minutes of baking time.
- Take the challah out of the oven. At this point your house should smell delicious. You can test the bread for doneness by turning it over and tapping on the bottom of the loaf—if it makes a hollow sound, it’s done. Let challah cool on the baking sheet or a wire cooling rack before serving.
- This recipe will make 1 very large challah, 2 regular challahs, or 24 mini challah rolls. I usually divide the dough in half to make 2 medium challahs, which are more manageable and easier to braid than a large one. Choose what works best for you!

Thursday, November 28, 2013
Thanksgiving 2013

Very grateful for the chance to share today with my awesome family. We were missing a few... . But they were never more than a thought away. Other than eating late due work schedules, sick people and our car getting broke into, our day was filled with traditions, family stories and fun! One of our traditions every year is to try a new recipe... This year, I decided the recipe would be the breakfast treat to share while we watched the parade. (Another family tradition!)
SOOOOO, I decided to make homemade "Salted Caramel Bacon Donuts" I keep hearing rave reviews about bacon & salted caramel this and bacon & salted caramel that. Anyway, after searching for several months for good recipes, no luck! I came up with my own, Here are the results.... They were delicious!
Ingredients
- 3 tbsp buttermilk
- 1/4 tsp salt
- 2 cups cake flour
- 1/4 cup cocoa powder
- 1/2 cup sugar
- 2 egg
- 1 tsp vanilla
- 1 tsp baking powder
- 1/2 tsp baking soda
- 2 tbsp butter cut
- 3 tbsp sea salt
- 2 cups caramel sauce frosting
- 1/2 lbs. cooked bacon (crumbled)
- Lightly spray pan.And set aside. In bowl shift flour, cocoa , baking soda, and baking powder. Mix in sugar and salt, add in butter using your fingers to blend everything together. In a small bowl, mix egg, buttermilk and vanilla. Then add to flour mix and fold together.
- Pour batter in donut pan so that it's 1/2 full and bake for 8-10 mins.
- Once bake take out and cool. After it has cool, drizzle caramel sauce over donuts and sprinkle sea salt and crumbled bacon over the top.

Tuesday, November 26, 2013
TTT's - National Cake Day
Ingredients
- 2 cups white sugar

- 2 cups all-purpose flour
- 1 cup unsweetened cocoa powder
- 1 teaspoons baking soda
- 1 teaspoons baking powder
- 1 teaspoon salt
- 2 eggs
- 1 cup buttermilk
- 1/2 cup applesauce
- 1/2 cup vegetable oil
- 2 teaspoons vanilla extract
- 1 cup boiling water

Instructions
Preheat oven to 350 degrees F, Grease and flour a 9x13 baking pan and set aside.
In a medium bowl, shift together the flour, cocoa, baking soda, baking powder and salt, set aside.
In a medium mixing bowl, cream together sugar, eggs, buttermilk, applesauce, oil and vanilla.
Next add flour mixture to egg mixture and fold together until well blended. Stir in the boiling water by hand, mix well, the batter will look runny, but it will work.
Pour evenly into floured pan. Bake for 30 to 35 minutes in the preheated oven, until a toothpick inserted comes out clean.
Cool for 10 minutes before removing from pan to decorate. (I just leave mine in the pan and frost the top). This cake is very delicious by itself, served either slightly warm or chilled! We frosted this cake with our new salted caramel frosting and added sprinkles. but I remember it being served with cherry pie filling and whipped cream.
Tuesday, November 19, 2013
"Tuesday's with Dorie"... Double Chocolate Cookies
Our recipe today was Dori's Double Chocolate Cookies found on page 329 in the "Baking with Julia"

Love these cookies... simple and sweet goodness that works both as a drop cookie and a rolled freezer cookie. They make great gift or sack lunch cookies because the hold there shape very well and yet stay soft and chewy. We love to dunk them is milk!

Love these cookies... simple and sweet goodness that works both as a drop cookie and a rolled freezer cookie. They make great gift or sack lunch cookies because the hold there shape very well and yet stay soft and chewy. We love to dunk them is milk!
Tuesday, November 5, 2013
"Tuesday's with Dorie"... Rustic Pumpernickle Loaves

So today we were challenged to make the Pumpernickel Loaves that can be found on page 95 in the "Baking with Julia". I have made pumpernickel bread before and this recipe was easy but a little time challenging for me with all the steps and then hanging the bread. And I was majorly disappointed, after going to all the work, that my bread was a little dense and tasteless. I think I will try the recipe again, but at this point I think I like my other recipe much better. This is the first recipe that I have tried that I was a little disappointed with.
Tuesday, October 22, 2013
TTT's - Blueberry Blossoms
In staying with our cookie theme this month, we decided to do a little experimenting in the kitchen this week... One son wanted sugar cookies, I wanted shortbread cookies and the other son wanted blueberry cookies. So we put our creative minds together and we came up with Sugared Shortbread Blueberry Blossoms. :)

- 1 1/2 cup Granulated Sugar
- 1 cup (2 sticks) butter soft
- 2 egg
- 1 Teaspoon vanilla
- 3 1/2 cups all-purpose flour
- 1 Teaspoon baking soda
- 1/2 Teaspoon cinnamon
- 1/8 Teaspoon nutmeg
- 1 Teaspoon finely chopped pecans
- 1 cup raw sugar
- 1/2 can blueberry pie filling
DIRECTIONS
In large bowl, blend sugar and butter. Beat in egg and vanilla until light and fluffy. Mix in flour and baking soda. Divide dough in half. Shape each half into roll about 1 1/2 inches in diameter. Wrap and refrigerate for 1 hour until chilled. * Cut rolls into 1/4-inch slices. Place on ungreased baking sheet and sprinkle generously with additional sugar. Bake in 375° oven for 10 to 12 minutes or until lightly browned around edges. Cool on wire rack.

Subscribe to:
Posts (Atom)