Tuesday, November 28, 2023

TWD…. “Mulled-Butter Apple Pie”

 TWD::::: Our second bake with my “Tuesday’s with Dorie” group this month was “Mulled-Butter Apple Pie”. We actually made this pie last Saturday, so that we could include it in our Thanksgiving desserts. 


As delicious as this recipe sounded, I found it to be a little lacking in flavor and texture. I think though it could have been me, the baker, I only had two apples and one pie crust left, so I think that rich boldness that would have come from a deep dish style pie would have been better. 


If you would like to try this pie, you can find the recipe on page 245 in Dorie Greenspan’s new cookbook entitled “Baking with Dorie: Sweet, Salty & Simple”


Saturday, November 25, 2023

Happy Thanksgiving Table full of pies….

Along with our standard favorites like banana cream and pumpkin,


We had three new pies to taste this year…..

Butterscotch S’More Pie (Lily’s Idea)

Pumpkin Cheesecake Swirl (Parker made it)

Mulled-Butter Apple Pie ( my “Tuesday’s with Dorie” 2 challenge this month)

Wednesday, November 22, 2023

Homemade Noodles

 This week my WORKDESK was my kitchen table full of homemade noodles for our traditional noodle gravy for Thanksgiving this weekend…

My recipe for noodles is a little different than I make for my homemade pasta, because we like the noodles in our gravy to be a little thicker and softer, more like a dumpling. 

Ingredients

  • 1 cup flour
  • ½ teaspoon salt
  • 1 egg
  • 2 tablespoons cold heavy cream 

Instructions

    1. Whisk together flour and salt. Create a well in the middle.

    2. Add egg and cream into the well. Using a fork, whisk egg and cream allowing flour to mix into the dough slowly. Stir until a dough forms. The dough will be sticky.

    3. Turn dough out onto a lightly floured surface. Knead the dough until it becomes smooth and shiny. Knead another 5 minutes  

    4.  On a lightly floured surface, roll the dough to desired thickness, about 1/4 inch thick, (Remember, they will swell a bit as you cook them.)

    5. Roll dough into a tube, lightly dusting dough with flour with each roll. (like a jelly roll) Using a dough cutter, or sharp knife,  cut noodles into even strips, (remember the wider the strip the wider the noodle.) Unroll the noodles to dry and spread out on table or cookie sheet to dry. 

    6. Let dry for a least 2-3 hours, better if they dry for 2-3 days. Package noodles in an airtight container. Refrigerate for up to 3 days or freeze for up to 8 months.


Wednesday, November 15, 2023

Stuffed Pork Loin


 Our Workshop Wednesday this month was “Stuffed Pork Loin”. The challenge was to follow the video included in this post but change up the ingredients in our stuffing mixture. We had some leftover mashed potatoes and I roasted some veggies that we added to the bacon and apples. We also served ours with a creamy garlic sauce. 

Video… https://youtu.be/5bSMhGkeBMc?si=wUm3Es6dVu1wP1Hp  


Tuesday, November 14, 2023

TWD: Peacan-Cranberry Loaf

This week our “Tuesday’s with Dorie” recipe was “Pecan - Cranberry Loaf” found on page 73 in her most recent cookbook entitled “Baking with Dorie: Sweet, Salty & Simple”. I have really spending time this year with this group and have enjoyed many recipes, I always seem to learn something new from every recipe and for this I am GRATEFUL! 😁

Since, out of respect to Dorie, we have been asked not to share the exact recipe, I thought I would share a couple of tips that I learned from this very yummy, “have to make again” loaf of sweet style bread. world.

… my First thought was the recipe called for 1/2 teaspoon ground coriander, was not sure how I felt about that being in the flavor profile. So I made two loaves, one loaf without and the other loaf I used fresh ground coriander and I was like… “Why haven’t I thought to try this before” it made all the difference in the

… the other tip I learned from this recipe was before adding the orange zest into the mix, Dorie recommended rubbing the orange zest into the white sugar with my hands before adding it to the mix. This also made a huge difference. It brightened the orange flavor and gave it more umph without the bitter back-taste that sometimes comes with baked orange zest. 

… The other thing for me and this recipe was it called for chopped fresh or frozen whole cranberries, which I didn’t have and because I live so far from town, I used fresh Blackberries that I had on Hand. 


I totally and completely fell in love with this recipe… I am pretty sure it might be served alongside my fruitcake at Christmas this year.


Thursday, November 9, 2023

Butterscotch Indoor S’More

 This is what happens when the Princess finds out you have puff pastry dough left over from your other event...


She wanted to make Grandpa a "Butterscotch Indoor S'more" Tart. She came up with the recipe all by her self, she made the pudding all by herself, assembled it all by herself and as she so proudly shared with Grandpa... "the only thing YaYa did was make the puffy stuff because the oven was a little too hot for me!" (I chopped the chocolate too, but who's counting) 🥰😉


Recipe is easy…

1 sheet of puff pastry cut into 6 rectangles and baked until golden brown

1 package of instant butterscotch pudding made as directed on package

1 small (6 year old) handful of mini marshmallows (each pastry gets a handful)

1 Plain milk chocolate candy bar chopped into very small chunks 

1 can of whipped cream for topping


Tuesday, November 7, 2023

Techiqune Tuesday - “Upside-down Sweet & Savory Puff Pastry”

 Technique Tuesday... (came early in the month this month)


One of the new recipes/techniques that has taken Pinterest by storm is the  "Upside-down Puff Pastry Tarts" and our table just wouldn't be the same if we didn't give them a try... https://pin.it/3mw6sNI


The thing I really liked about these yummy treats if the fact that the combinations and flavors are endless and easy to make for a large group like a Relief Society Fall Social.


We made 3 different combos...


Blackberry & Basil - Gruyere  cheese 


Bacon & Fig - Parmesan cheese

Onion & Pineapple - cream cheese


We followed the video using the olive oil and balsamic. They tasted delicious but we were a little disappointed that they stuck to the parchment paper really bad. We will make them again, 


Next time we want to try some different flavors like maybe....


Peaches & Prosciutto

Cherry & Thyme

Tomato & Green Olive & Pecan

Saturday, November 4, 2023

Sourdough Saturday… “Pain de Mie”

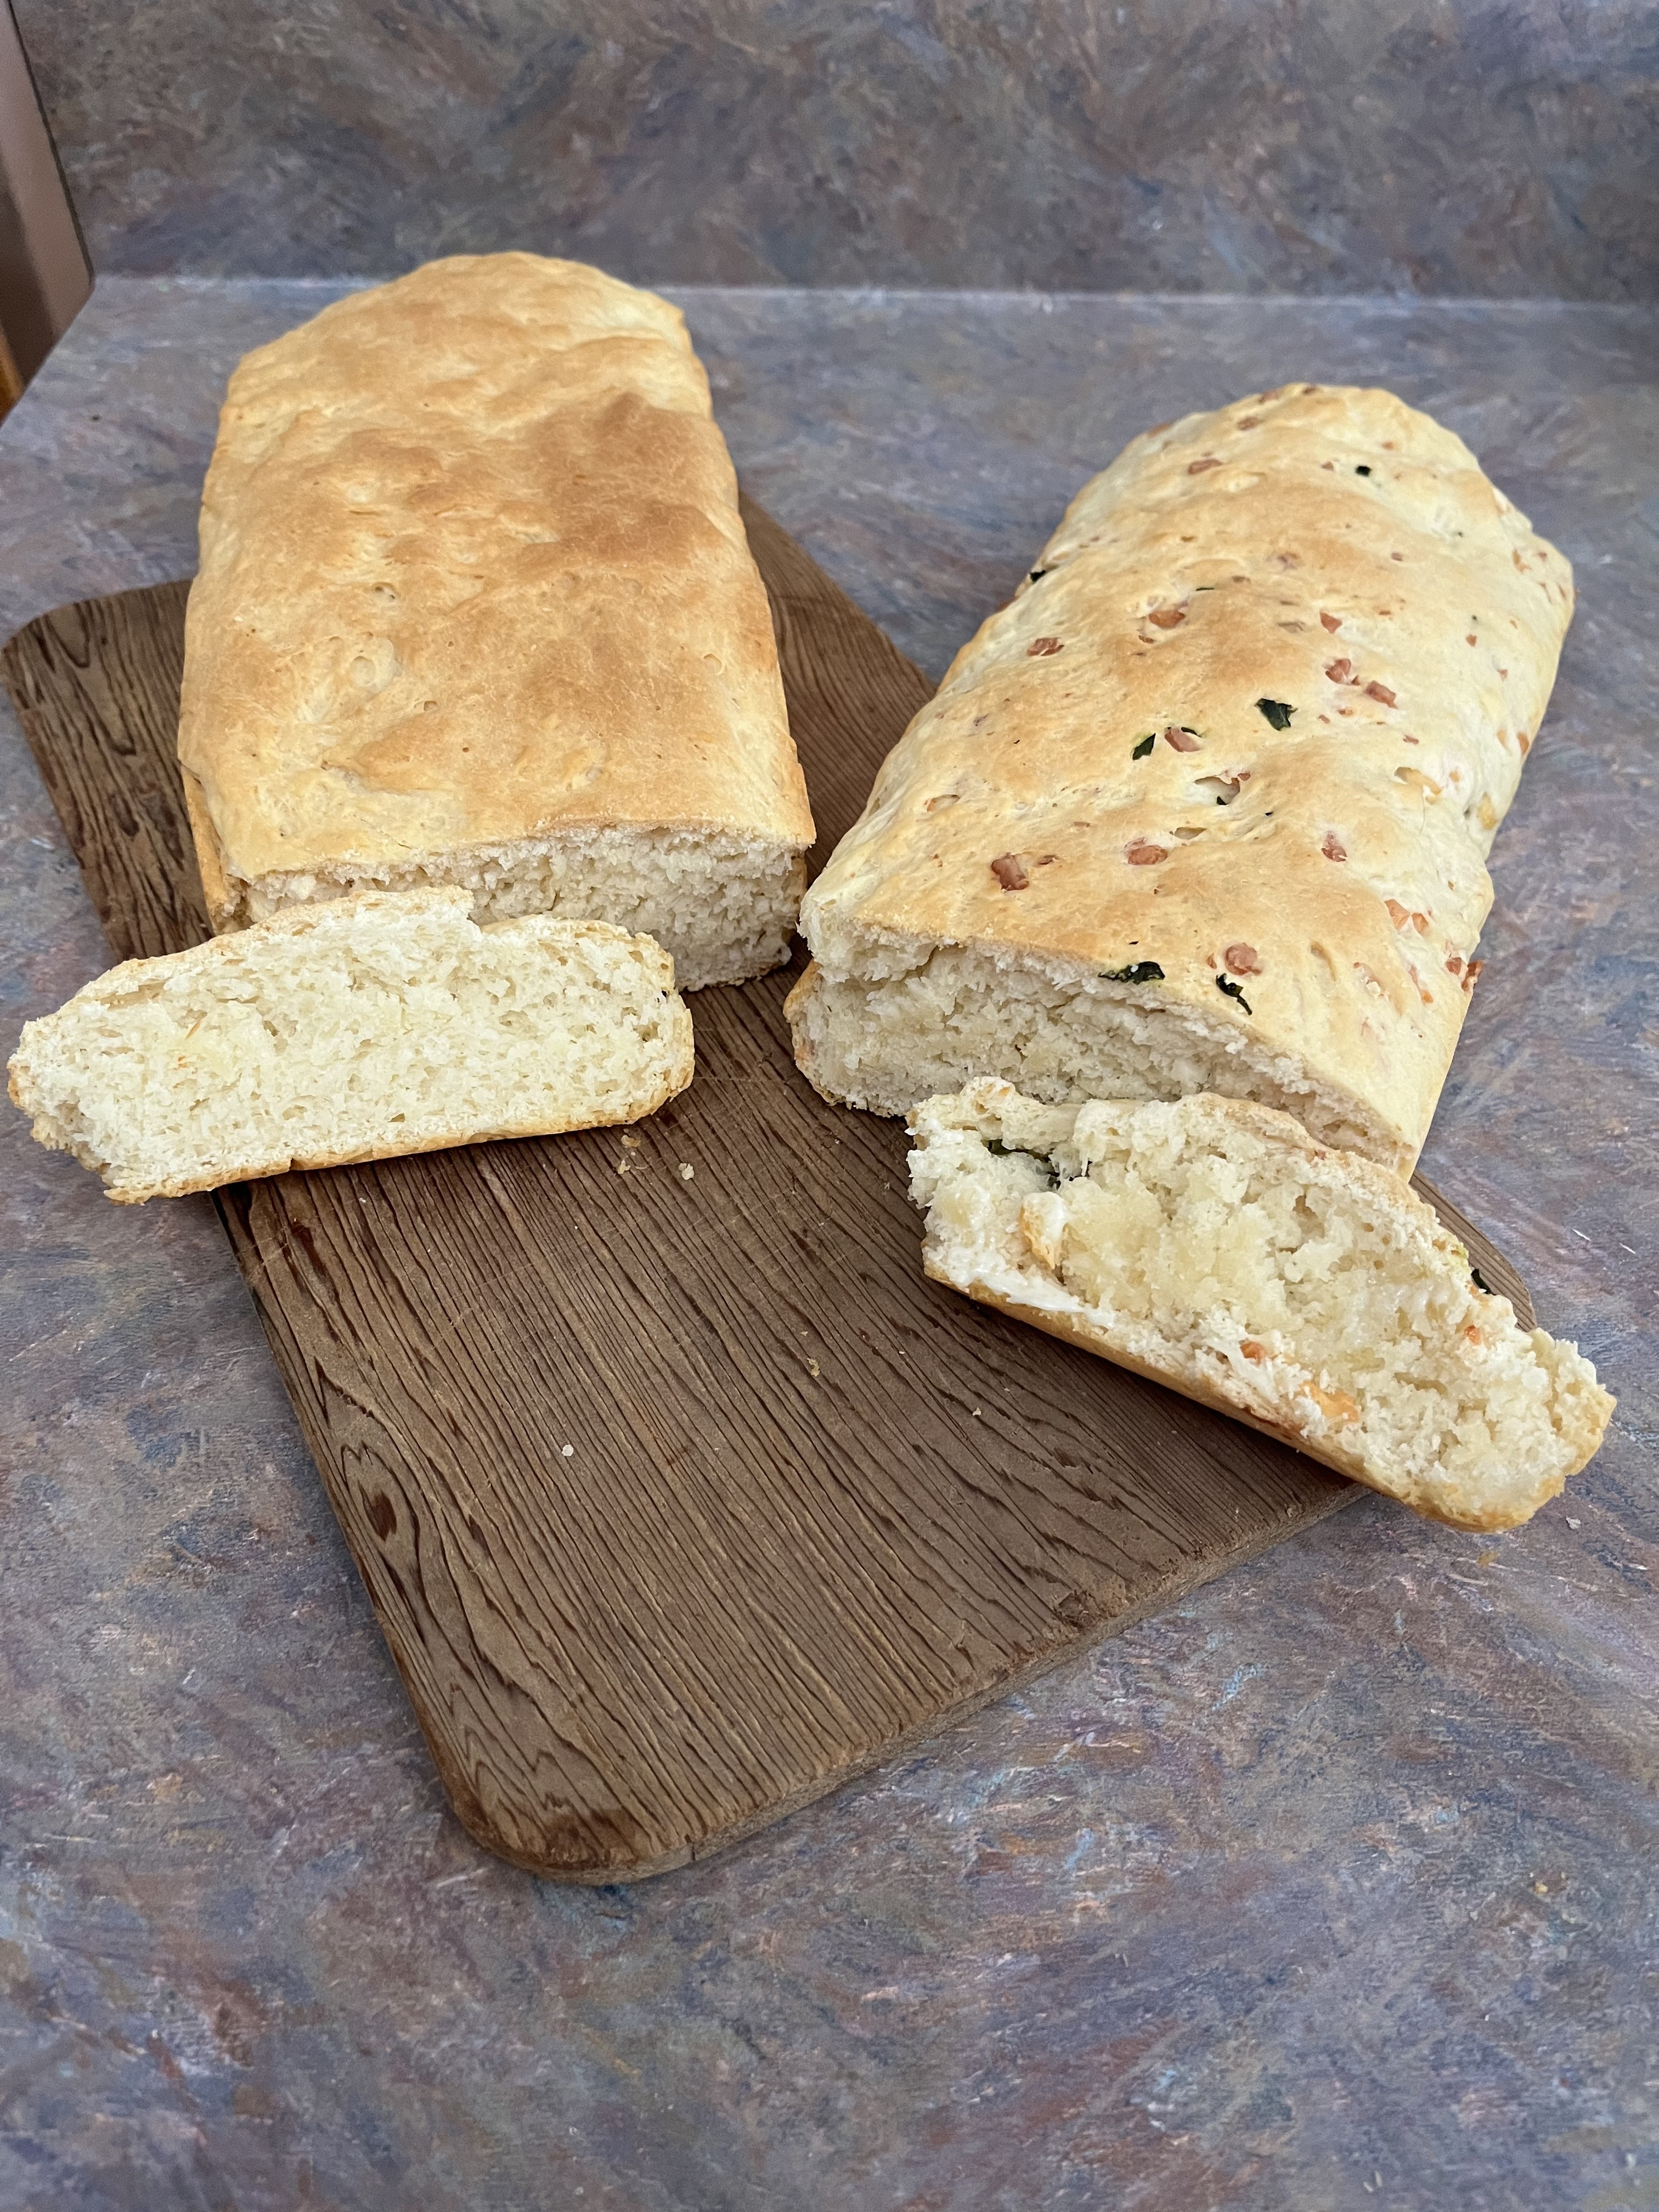
 This Sourdough Saturday really isn’t a sourdough bread. Today we made “Pain de Mie” or better known in America as “Pullman Bread”. 

This is the last French bread recipe in our cookbook and I love the how easy everything this was to make…💝  This is an enriched dough of milk, sugar and butter that becomes well-developed as the fat and sugar works together. 

Traditionally this bread is baked in a special square pan with a lid on top known s. “Pullman Loaf Pan”, so that it comes out totally square, perfect for sandwiches and Croque Monsieur. 

The recipe makes two loaves, the first loaf is fresh Basil & Asiago Cheese and the second loaf is just plain. 

Recipe:

 1/4 cup warm milk

2 Tablespoons granulated sugar 

1 package instant yeast— 1 1/2 Tablespoons if measuring from tin

1 1/2 cups whole milk 

4 tablespoons unsalted butter 

5 cups (19 ounces/544 grams) unbleached all-purpose flour, spooned and leveled 

1 1/2 teaspoons fine sea salt


In a large bowl, whisk together the 1/4 cup warm milk , sugar, and yeast. Let rest until bubbly, about 5 minutes. 

Meanwhile, combine the milk and butter. Heat until hot to the touch and the butter has melted, about 1 1/2 minutes. (you can use microwave or a small saucepan over low heat, being careful not to let the milk boil). 

When the yeast has begun to foam, add the flour and salt to the bowl. Pour in the milk and butter mixture. Stir with a wooden spoon until a shaggy dough forms. 

 Knead the dough on until soft, smooth, and elastic, but moving cleanly off the sides of the bowl, you can knead the dough by hand on a lightly floured surface for about 10 to 15 minutes. Cover the bowl with plastic wrap and allow it to rest until doubled in size, about 1 hour. 

Lightly grease a 13-by-4-inch Pullman pan and its lid with oil or nonstick cooking spray. Next, shape the loaf: Flour a work surface generously, place dough on work surface shaping the dough into a rectangle as you do so, approximately 10 inches by 7 inches in size. With the short end closest to you, fold the longer left side into the center of the rectangle, pressing the seam tightly. Repeat with the longer right side. Repeat this folding into the center with the two short sides. Rotate the dough 90° so one longer side is now closest to you. Fold and press the longer sides into the center once more. Flip the dough over—you should now have a nice smooth surface for the top of the loaf. Gently and evenly roll the dough back and forth to form a 13-inch log. Place the dough in the prepared loaf pan. 

Cover the pan with plastic wrap, and let the dough rest for a second time until it reaches just about 1 inch from the lip of the pan, no higher, 45 minutes to an hour. Position a rack to the center of the oven, and preheat it to 400°F. Slide the cover onto the pan. Bake for 25 minutes. Remove the cover and bake for 20 minutes more, or until an instant-read thermometer inserted in the center of the loaf reads 190°F. Turn the bread out of the pan onto a wire rack and let cool completely before slicing. Store in an airtight container for up to 3 days.


Thursday, November 2, 2023

Thrifty Thursday… “Tijuana Toss”


 Thrifty Thursday.... I have lots of leftovers and I have been craving a Mexican style casserole that my mom use to make called "Tijuana Toss", this is what I came up with... 

Ingredients

1 pound ground beef

1/2 medium yellow onion diced

2 teaspoons minced garlic 2 cloves

1/4 cup taco seasoning

1/2 cup water

1 bottle of Avocado salsa

1 can corn (I used leftover roasted)

1 can black beans, drained and rinsed

3-5 cups crushed tortilla chips 

3 cups shredded cheese jack and cheddar

2 medium tomato diced, save 1 for garnish

1 bunch green onions sliced for garnish

1 cup shredded lettuce for garnish

sour cream for serving


Instructions

Preheat the oven to 350 degrees Fahrenheit. Spray a 9x13 casserole dish with non-stick cooking spray and set aside.

Cook ground beef and onion in a large skillet over medium heat until the meat is browned and the onions softens.

Add minced garlic to the skillet and saute for 1-2 minutes longer.

Add taco seasoning and water and stir over medium heat until well combined.

Stir the tomatoes (juices included), corn and black beans into the meat mixture and heat through.

Line the prepared baking dish with 1/3 bottle of salsa and 1 cup of tortilla chips overlapping slightly to cover the bottom of the casserole dish.

Spread 1⁄3 of the meat mixture over the tortillas. Sprinkle 2 cups of the cheese over the meat mixture.

Continue layering salsa, tortilla chips, meat mixture, and cheese to form three layers total.


Cover with aluminum foil and bake for 30-40 minutes until casserole is bubbly and the cheese is fully melted.


Garnish with diced tomatoes and green onion. Let the casserole sit for 10 minutes for easy slicing and serving.


Serve with sour cream, tomatoes lettuce and extra cheese. We added diced cucumbers too.

Tuesday, October 10, 2023

TWD: The Everything Cake

 Our Tuesday's With Dorie this week was her recipe for "The Everything Cake" found on page 129 in her new cookbook "Baking with Dorie: Sweet & Salty & Simple". 

Since we are encouraged not to post the recipe I will share that this is a very simple traditional sponge style cake, but instead of using 6 whole eggs, her recipe only calls for 3 whole eggs and no cream of tarter. 


Even though Dorie lists several different combinations of flavors and mix-ins, I  loved the look of her cake that she has pictured, so I also made mine with what I think may have been Mandrian oranges. I used both the zest and the slices in my cake and then used zest and juice in my glaze. 


I really loved the texture and simpleness of this cake. ❤️  

Tuesday, January 10, 2023

Iced Honey-Apple Scones with Spelt


 TWD.... this week our "Tuesday's With Dorie" baking group enjoyed baking some very yummy "Iced Honey-Apple Scones with Spelt" from Dorie's new cookbook entitled "Baking with Dorie: Sweet, Salty & Simple. 

I can honestly say that even though we have agreed to not share the recipe here on Facebook, I would encourage everyone to find and try this recipe.... we really enjoyed these tasty little treats with our hot chocolate and fireplace the other night. 

I loved the soft nutty flavor that the spelt flour gave these scones. It was a very welcome touch to a very cakey style scone. We will definitely make these again, maybe with raisins or dried cranberries next time.

Saturday, January 7, 2023

Pain de Campagne - (French Country Bread)

Sourdough Saturday…. I love to crack the binding on a new cookbook, I love to flip through all the wonderful pictures and then I go back a start marking recipes. So you can only imagine the fun I am having checking out the new cookbook about European Bread making that my husband gave me for Christmas. The book is entitled “Bread on the Table” by David Norman and even though he is the owner of the Austin Texas’s “Easy Tiger Bake Shop & Beer Garden”, he studied Bread making like people study art while he was in Europe. 

 I am so excited to spend the year making my way through this new book, here is the first loaf of bread… “Pain De Campagne” or also known as “French Country Bread”. 

I was so excited to learn, as I started reading, that most of the breads in this book start with a “STARTER” so me thinking…. “YUM SOURDOUGH!” Got all excited and you can only imagine when after getting through the “STARTER” making process that this is what it looked like (see photo #3) compared to my poor, liquid, runny, fermented, pioneer heritage start in my big glass bottle. Then only to realize that now it sets in the fridge for 12-36 hours. (iPhoto #4) 

Yup…. Then you take that gob of doughy start and you cut it into chunks and mix it with the rest of the ingredients. (Photo #5)Then after a lot of mixing, kneading back in the fridge fermenting, then proofing and then shaping… then baking… we’ll let’s just say ——- 3 days later WE HAVE BREAD TO EAT!!!!! 


Oh, but I learned a lot and the bread was so yummy. 🤗😁💝 


Tuesday, January 3, 2023

Homemade Hummus

 Toss-Together Tuesday:::::::: spent time today tossing some things around on my desk while enjoying (from a far) the 13 1/2 inches of snow setting in my front yard. Glad I could spend the day inside, hanging out stamping with the youngest princess and my new Keto friendly menu. Here are some highlights from today.... 💕

Enjoy.

 Cauliflower & Roasted Red Pepper Hummus Ingredients

16 ounce can chickpeas, drained (save liquid) 

4 tablespoons chickpea liquid

1/2 cup cooked cauliflower cooled

1/4 cup roasted red pepper

2 tablespoons olive oil

1 clove garlic, or more to taste

1/4 teaspoon ground nutmeg

1/4 teaspoon paprika 

1 teaspoon of “Everything Bagel” Seasoning

1/2-1 teaspoon salt, or to taste

1 tablespoons fresh lemon juice

2-6 tablespoons cold water


Instructions

To a food processor, add the drained and rinsed chickpeas, chickpea liquid, cauliflower, red pepper, olive oil, garlic, nutmeg, paprika, salt, lemon juice and 2 tablespoons of cold water.

Puree for about 4-5 minutes until smooth and creamy. If it's not quite creamy or too thick, add a few more tablespoons of cold water. This will help fluff it up and make it creamy and smooth.

Taste and season with additional salt, garlic, tahini or lemon juice if needed.

Add to a bowl and garnish with toppings of choice. Serve with pita bread and veggie sticks or spread on toast, sandwiches, mix into pasta or use anywhere else you like.