As we stop and reflect back on all the many blessings that our bountiful Pantry has welcomed us with during the past year, we look forward to restocking the pantry full of goals, ideas and recipes for 2014. We have gained a sense of order and budget wise menus, packed with lots of nutritional choices for a awesome guide to a healthier lifestyle.We would like this to become a over interactive blogsite where all FOODIES can come and enjoy hanging out!
This next year we would like to offer the following Daily Guide here at the Pantry...
MONDAY MADE-OVER ---- (Where we take a recipe and do a complete makeover to gear it for a healthy life choice, without skimping on the taste of the traditional treat.)
TUESDAY'S WITH DORI ---- (Where we follow the suggest plan of spending the time with Tori Greenspan and Friends, website: "Tuesday's with Dorie")
WEDNESDAY's Words of Wisdom--- (This will be a new feature where we will post a picture of a food item and the first person who posts in the comments what it is and what you would cook with it, will win a prize from the Party... This is a bit of fun to help us all expand our food Knowledge.... Everyone is invited to play!)
THRIFTY THURSDAYS ---- (Where we combine "Blog Hoppers" (2nd & 4th) and the "Five Dollar Dinner" Challenges (1st & 3rd), to help us stay on budget and freshen up our cooking skills.
FRUITFUL FRIDAY ---- (Where we will be featuring Favorite Family recipes and Home Storage Ideas that have helped to fill our bountiful Pantry)
SUPER SATURDAY ---- (Where we will be posting educational and starter recipes, along with some cooking 101 skills sets to help not only the basic cook but even the seasoned chef.)
SUNDAY ---- For those of you who are new to our site... Reminder: The Pantry is dark on Sundays!
We are God fearing, church going people who, enjoy a day full of sabbath blessings, family time and everyday, over-the-counter snacks !!!!!!

Tuesday, December 31, 2013
Tuesday, December 3, 2013
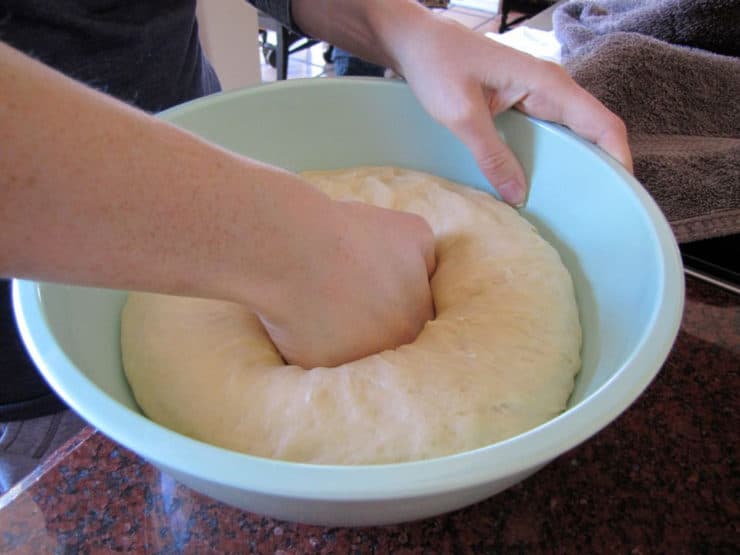
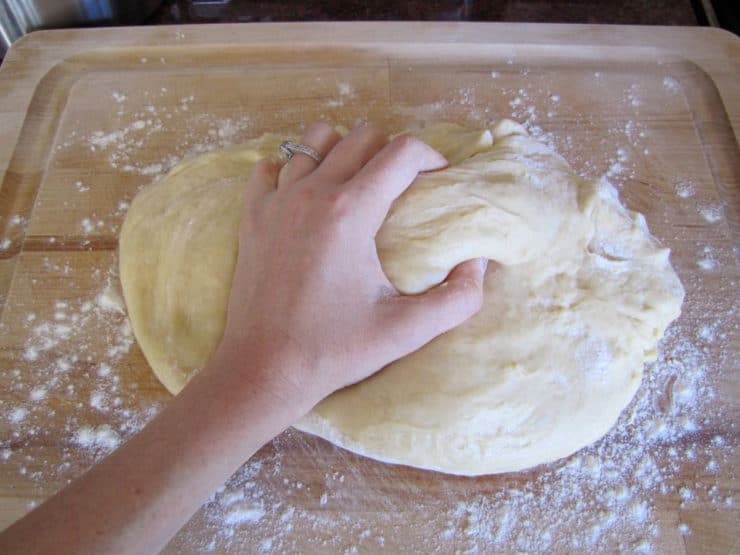
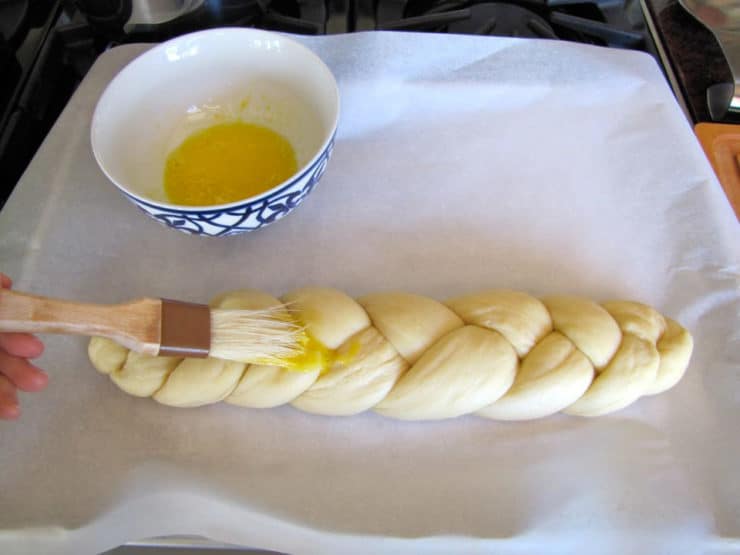
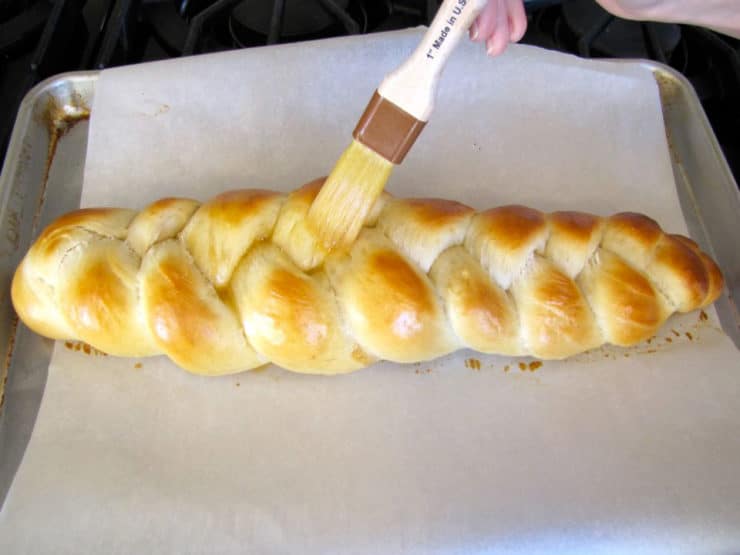
"Tuesday's with Dorie"... Making Challah
I had so much fun learning how to make traditional challah yesterday... So much love, respect and culture involved.
DOUGH INGREDIENTS
- 1 1/2 cups lukewarm water, divided
- 1 packet active dry yeast
- 1 tsp sugar
- 1 egg
- 3 egg yolks
- 1/3 cup honey
- 2 tbsp canola oil
- 2 tsp salt
- 4 1/2 to 6 cups flour
EGG WASH INGREDIENTS
- 1 egg
- 1 tbsp cold water
- 1/2 tsp salt
OPTIONAL INGREDIENTS
- Raisins, chocolate chips (1 ½ cups of either)
OPTIONAL TOPPINGS
- Sesame seeds, poppy seeds, kosher salt
YOU WILL ALSO NEED
- Large mixing bowl, whisk, kitchen towel, cookie sheet, parchment paper, plastic wrap, pastry brush, timer
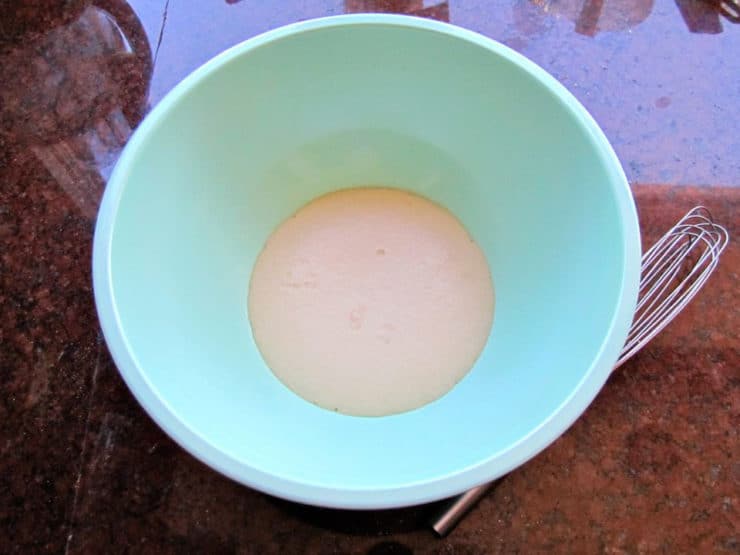
- Pour ¼ cup of the lukewarm water (about 110 degrees) into a large mixing bowl. Add 1 packet of Active Dry Yeast and 1 tsp of sugar to the bowl, stir to dissolve. Wait 10 minutes. The yeast should have activated, meaning it will look expanded and foamy. If it doesn’t, your yeast may have expired, which means your bread won’t rise—go buy some fresh yeast!
- Once your yeast has activated, add remaining 1 ¼ cup lukewarm water to the bowl along with the egg, egg yolks, honey, canola oil and salt. Use a whisk to thoroughly blend the ingredients together.
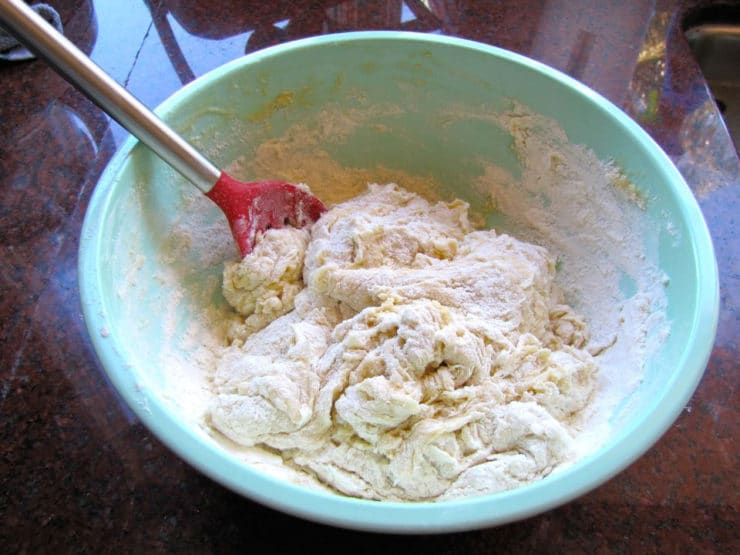
- Begin adding the flour to the bowl by half-cupfuls, stirring with a large spoon each time flour is added. When mixture becomes too thick to stir, use your hands to knead.
- Continue to add flour and knead the dough until it’s smooth, elastic, and not sticky. The amount of flour you will need to achieve this texture varies—only add flour until the dough feels pliable and “right.” If you plan to add raisins or chocolate chips to the challah, incorporate into the dough as you knead.
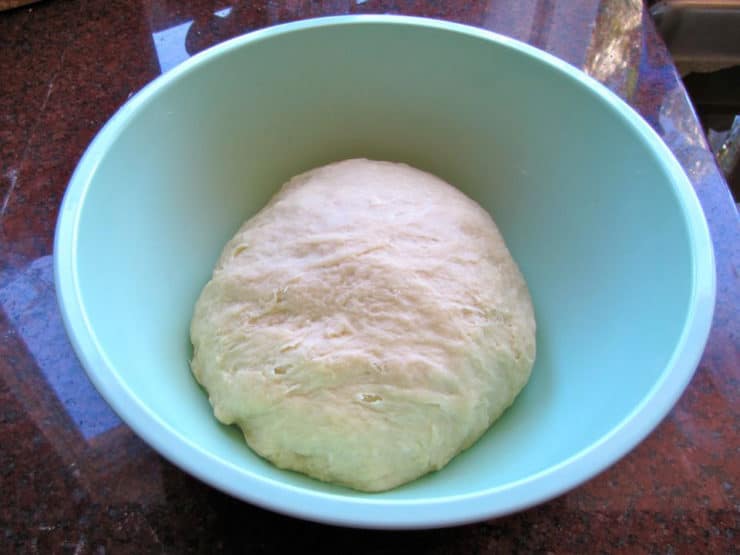
- Place a saucepan full of water on the stove to boil.
- Meanwhile, remove the dough from your mixing bowl and wash out the bowl. Grease the bowl with canola oil. Push the dough back into the bottom of the bowl, then flip it over so that both sides are slightly moistened by the oil.
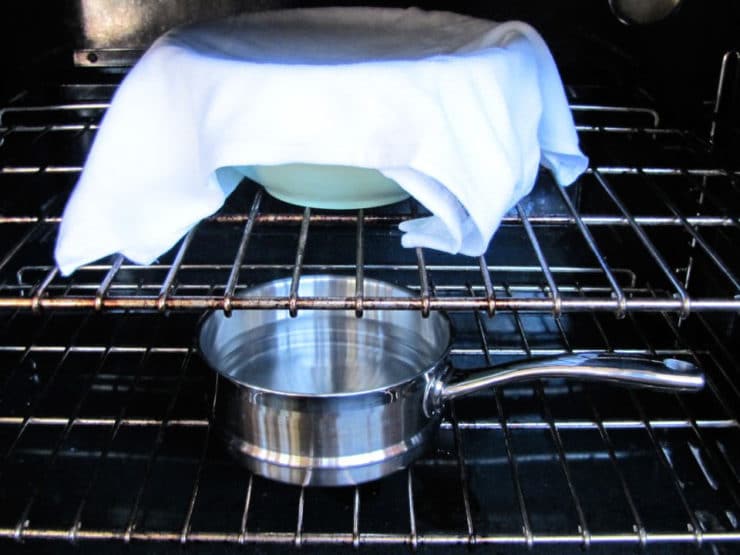
- Cover the bowl with a clean, damp kitchen towel. Place the bowl of dough on the middle rack of your oven. Take the saucepan full of boiling water and place it below the rack where your dough sits. Close the oven, but do not turn it on. The pan of hot water will create a warm, moist environment for your dough to rise. Let the dough rise for 1 hour.
- Take the dough bowl out and punch it down several times to remove air pockets. Place it back inside the oven and let it rise for 1 hour longer.
- Take the dough out of the oven. Flour a smooth surface like a cutting board. Punch the dough down into the bowl a few times, then turn the dough out onto the floured surface. Knead for a few minutes, adding flour as needed to keep the dough from feeling sticky.
- Now your dough is ready to braid. If you plan to separate and bless the challah, do it prior to braiding. Click here to learn how to braid challah.
- After you’ve braided your challah, place it on a cookie sheet lined with parchment paper (this will catch any spills from your egg wash and keep your challah from sticking to the cookie sheet).
- Note: I usually only put a single challah braid on a cookie sheet, since they tend to expand a lot when baking.
- Prepare your egg wash by beating the egg, salt and water till smooth. Use a pastry brush to brush a thin layer of the mixture onto the visible surface of your challah. Reserve the leftover egg wash.
- Let the braid rise 30 to 45 minutes longer. You’ll know the dough is ready to bake when you press your finger into the dough and the indentation stays, rather than bouncing back.
- Heat oven to 350 degrees F. The challah needs to bake for about 40 minutes total, but to get the best result the baking should be done in stages. First, set your timer to 20 minutes and put your challah in the oven.
- After 20 minutes, take the challah out of the oven and coat the center of the braid with another thin layer of egg wash. This area tends to expand during baking, exposing areas that will turn white unless they are coated with egg wash.
- Turn the tray around, so the opposite side is facing front, and put the tray back into the oven. Turning the tray helps your challah brown evenly—the back of the oven is usually hotter than the front.
- The challah will need to bake for about 20 minutes longer. For this last part of the baking process, keep an eye on your challah—it may be browning faster than it’s baking. Once the challah is browned to your liking, take the tray out and tent it with foil, then place it back in the oven. Remove the foil for the last 2 minutes of baking time.
- Take the challah out of the oven. At this point your house should smell delicious. You can test the bread for doneness by turning it over and tapping on the bottom of the loaf—if it makes a hollow sound, it’s done. Let challah cool on the baking sheet or a wire cooling rack before serving.
- This recipe will make 1 very large challah, 2 regular challahs, or 24 mini challah rolls. I usually divide the dough in half to make 2 medium challahs, which are more manageable and easier to braid than a large one. Choose what works best for you!

Thursday, November 28, 2013
Thanksgiving 2013

Very grateful for the chance to share today with my awesome family. We were missing a few... . But they were never more than a thought away. Other than eating late due work schedules, sick people and our car getting broke into, our day was filled with traditions, family stories and fun! One of our traditions every year is to try a new recipe... This year, I decided the recipe would be the breakfast treat to share while we watched the parade. (Another family tradition!)
SOOOOO, I decided to make homemade "Salted Caramel Bacon Donuts" I keep hearing rave reviews about bacon & salted caramel this and bacon & salted caramel that. Anyway, after searching for several months for good recipes, no luck! I came up with my own, Here are the results.... They were delicious!
Ingredients
- 3 tbsp buttermilk
- 1/4 tsp salt
- 2 cups cake flour
- 1/4 cup cocoa powder
- 1/2 cup sugar
- 2 egg
- 1 tsp vanilla
- 1 tsp baking powder
- 1/2 tsp baking soda
- 2 tbsp butter cut
- 3 tbsp sea salt
- 2 cups caramel sauce frosting
- 1/2 lbs. cooked bacon (crumbled)
- Lightly spray pan.And set aside. In bowl shift flour, cocoa , baking soda, and baking powder. Mix in sugar and salt, add in butter using your fingers to blend everything together. In a small bowl, mix egg, buttermilk and vanilla. Then add to flour mix and fold together.
- Pour batter in donut pan so that it's 1/2 full and bake for 8-10 mins.
- Once bake take out and cool. After it has cool, drizzle caramel sauce over donuts and sprinkle sea salt and crumbled bacon over the top.

Tuesday, November 26, 2013
TTT's - National Cake Day
Ingredients
- 2 cups white sugar

- 2 cups all-purpose flour
- 1 cup unsweetened cocoa powder
- 1 teaspoons baking soda
- 1 teaspoons baking powder
- 1 teaspoon salt
- 2 eggs
- 1 cup buttermilk
- 1/2 cup applesauce
- 1/2 cup vegetable oil
- 2 teaspoons vanilla extract
- 1 cup boiling water

Instructions
Preheat oven to 350 degrees F, Grease and flour a 9x13 baking pan and set aside.
In a medium bowl, shift together the flour, cocoa, baking soda, baking powder and salt, set aside.
In a medium mixing bowl, cream together sugar, eggs, buttermilk, applesauce, oil and vanilla.
Next add flour mixture to egg mixture and fold together until well blended. Stir in the boiling water by hand, mix well, the batter will look runny, but it will work.
Pour evenly into floured pan. Bake for 30 to 35 minutes in the preheated oven, until a toothpick inserted comes out clean.
Cool for 10 minutes before removing from pan to decorate. (I just leave mine in the pan and frost the top). This cake is very delicious by itself, served either slightly warm or chilled! We frosted this cake with our new salted caramel frosting and added sprinkles. but I remember it being served with cherry pie filling and whipped cream.
Tuesday, November 19, 2013
"Tuesday's with Dorie"... Double Chocolate Cookies
Our recipe today was Dori's Double Chocolate Cookies found on page 329 in the "Baking with Julia"

Love these cookies... simple and sweet goodness that works both as a drop cookie and a rolled freezer cookie. They make great gift or sack lunch cookies because the hold there shape very well and yet stay soft and chewy. We love to dunk them is milk!

Love these cookies... simple and sweet goodness that works both as a drop cookie and a rolled freezer cookie. They make great gift or sack lunch cookies because the hold there shape very well and yet stay soft and chewy. We love to dunk them is milk!
Tuesday, November 5, 2013
"Tuesday's with Dorie"... Rustic Pumpernickle Loaves

So today we were challenged to make the Pumpernickel Loaves that can be found on page 95 in the "Baking with Julia". I have made pumpernickel bread before and this recipe was easy but a little time challenging for me with all the steps and then hanging the bread. And I was majorly disappointed, after going to all the work, that my bread was a little dense and tasteless. I think I will try the recipe again, but at this point I think I like my other recipe much better. This is the first recipe that I have tried that I was a little disappointed with.
Tuesday, October 22, 2013
TTT's - Blueberry Blossoms
In staying with our cookie theme this month, we decided to do a little experimenting in the kitchen this week... One son wanted sugar cookies, I wanted shortbread cookies and the other son wanted blueberry cookies. So we put our creative minds together and we came up with Sugared Shortbread Blueberry Blossoms. :)

- 1 1/2 cup Granulated Sugar
- 1 cup (2 sticks) butter soft
- 2 egg
- 1 Teaspoon vanilla
- 3 1/2 cups all-purpose flour
- 1 Teaspoon baking soda
- 1/2 Teaspoon cinnamon
- 1/8 Teaspoon nutmeg
- 1 Teaspoon finely chopped pecans
- 1 cup raw sugar
- 1/2 can blueberry pie filling
DIRECTIONS
In large bowl, blend sugar and butter. Beat in egg and vanilla until light and fluffy. Mix in flour and baking soda. Divide dough in half. Shape each half into roll about 1 1/2 inches in diameter. Wrap and refrigerate for 1 hour until chilled. * Cut rolls into 1/4-inch slices. Place on ungreased baking sheet and sprinkle generously with additional sugar. Bake in 375° oven for 10 to 12 minutes or until lightly browned around edges. Cool on wire rack.

Saturday, September 21, 2013
Spice Cake Muffins

2-1/2 cups sifted cake flour
2 teaspoons baking powder
1/2 teaspoon baking soda
1/2 teaspoon salt
1/4 cup shredded wheat
1 teaspoon cinnamon
1/4 teaspoon cloves
1/4 teaspoon nutmeg
1/2 cup butter, softened
1-1/4 cups packed brown sugar
3 eggs
1 cup buttermilk
1 teaspoon vanilla
1/4 cup crushed pineapple
1/4 cup chopped dates
1/4 cup grated coconut
1. Preheat oven to 350 degrees. For cupcakes, grease and flour a 12 cup cupcake pan.
2. Sift together flour, baking powder, baking soda, salt, and spices into bowl; set aside.
3. Place butter and brown sugar in a large mixer bowl. Blend until light and fluffy. Add eggs,
one at a time, beating well after each addition.
one at a time, beating well after each addition.
4. Stir in flour, alternating with the buttermilk. Stir in vanilla. Stir in shredded wheat, fruit and coconut.
5. Divide batter evenly into prepared cake pans. Bake for 30-35 minutes or until cake springs back when lightly touched, or when a toothpick inserted in center comes out clean. Cupcakes will bake for 20-25 minutes.
6. Place cupcake pans on wire rack to cool for 5-10 minutes, then turn out of pans and cool completely on racks.
Thursday, September 5, 2013
Thrifty Thursday ---- Easy-Does-It-Spaghetti!
1 lb ground chuck (yeah, I use hamburger)

2 cloves garlic, minced
2 8oz cans tomato sauce
1 - 1 1/2 tsp Italian seasoning
1 4oz can sliced mushrooms drained (yeah, I leave these out)
3 C tomato juice
6oz dry spaghetti, broken into 4"-5" pieces
Cook and drain meat and put in crock pot. Add all remaining ingredients except dry spaghetti and stir well. Cover and cook on low for 6-8 hours. (High 3-5 hours). Turn on high last hour and stir in dry spaghetti.
I double it for my family.
Monday, September 2, 2013
Make-Over Monday: Better than Oatmeal
My husband and I have been researching some whole grain breakfast alternatives to that old-fashioned, heart-warming bowl of sticky oatmeal. We have found that whole grain couscous flavored with fruit and cinnamon makes for a healthy whole grain, low-calorie breakfast suitable for kids as well as adults! This Breakfast couscous recipe and photo is courtesy of the Wheat Foods Council.


Ingredients:
1 16 ounce can apples or pears, dividedwater
1 tbsp butter
1 10 ounce package couscous
3 tbsp sugar
1/2 tsp cinnamon, or to taste
Preparation:
Drain fruit, reserving juice. Pour juice into measuring cup and add water to equal 2 cups. Prepare couscous according to package directions using the fruit juice and butter. Dice fruit; add to couscous.
Combine sugar and cinnamon and mix with couscous. Place in serving bowl and sprinkle with additional cinnamon, if desired. Serve at room temperature or chilled.
Makes 6 - (7/8 cup) servings of apple cinnamon couscous.
Calories per serving: 271
Nutrition: Each serving provides approximately: 271 calories; 6 g protein; 56 g carbohydrates; 3 g fiber; 2 g fat (1 g saturated); 5 mg cholesterol; 0 mcg folate; 1 mg iron; 22 mg sodium.
Friday, July 5, 2013
Super Saturday - Meat Cooking Tips
So how many of you actually B-B-Q for Easter? Here at the Pantry, we actually don't. We are pretty much traditionalist and love our baked ham. But just in case you do here are some very educational tips that you can use today or anytime throughout the summer...
Many times here at the pantry we have been asked how you can tell what stage or temperature your steak is at and the other day we came acrossed this awesome chart on pinterest that we thought would be good to share.

Many times here at the pantry we have been asked how you can tell what stage or temperature your steak is at and the other day we came acrossed this awesome chart on pinterest that we thought would be good to share.
Wednesday, July 3, 2013
Outdoor Cooking 2014- Day 1, Rubs & Sauces
It's the first Saturday in MAY and that means we are back in class. Today, here at the pantry, we are having a Kentucky Derby Tailgate Party and since we are transitioning from grilling to Bar-B-Queuing, We decided it would be good to explain the differences between Dry rubs, wet rubs and sauces. Even though they are similar in nature, they very in styles and all three have distinctive purposes. So we are going to share some of our ideas with all of you.
Dry Rubs
- We like dry rubs for grilling indoors and outdoors. They are made with dry spices and seasonings. They are all about flavor and don’t add any extra moisture to the meat. They will usually create a nice, crusty layer on the outside which locks in the juices. We like to make our dry rubs ahead of time, that way the spices have a chance to meld and we have them to use when we want them, we do lots of last minute grilling, based on our moods and weather. Dry rubs are great to store in bulk and if stored in an air-tight container they have a pretty good shelf live. We use dry rubs on both meats and vegetables prior to grilling.
Harris's Favorite Dry Rub
- 2 tablespoons black pepper
- 2 tablespoons paprika
- 1 tablespoon sea salt
- 1 tablespoon granulated garlic
- 1 tablespoon granulated onion
- 1 tablespoon beef or chicken seasoning
- 1 tablespoon ground celery
Combine all ingredients and store in an airtight container. Keep in a cool, dark place.
Wet Rubs
- Typically, wet rubs are a blend of seasonings and or spices that have a bold rich flavor. Then liquid is added to make a paste, which is rubbed on the meat. This helps to add moisture and helps to seal in the flavor at the same time. We often use cooking oils, honey, vinegars, fruit juices, mustard or liquid smoke added to the dry seasonings to create the paste. A wet rub is perfect for meats that you will be cooking or roasting on a lower heat for a longer period of time. Also remember that most oil and sugar-based wet rubs have a tendency to catch on fire if you try to cook over open hot flames. Be sure to watch your meat carefully and turn the meat over at regular intervals to avoid charring. Wet rubs can be used as marinades, but we usually do not you them for continual basting like you would a sauce or sop.
Rosemary, Lemon and Garlic Marinade
- 2 - 3 stalks fresh rosemary (washed)
- 6 cloves garlic
- 1/4 cup extra virgin olive oil
- 3 lemons
- 1/2 teaspoon freshly ground black pepper
- 1/4 teaspoon sea salt
Remove the rosemary leaves from the stalks and finely chop. Place them in a large resealable plastic bag.
Finely chop the garlic and add to the bag along with the juice from
the lemons, olive oil, salt & pepper. Slosh around to mix. Add
chicken and seal the bag, removing as much air as
possible. Place the bag in the refrigerator until you are ready to
cook and marinade up to 6 hours. This does not make a good basting sauce.
Sauces
- Sauces have a liquid base with the seasonings and spices blended in. We use lots of sauces for different meats and we love to experiment with different flavors and textures. We use them mostly for BBQ's and continual basting on cuts of meat that tend to get dry during grilling. They make great marinades, but have a tendency to stay thick, so not much flavor is absorbed into the meats and once a sauce has been used as a marinade, it has come in contact with the rawness of the meat and it cannot be re-used because of contaminants. They are especially good used to sop, mop and baste while your meat in on the grill.
Soda Sauce
- 2 Tbsp butter
- 6 green onions, chopped finely
- 4 cloves garlic, crushed
- 6 oz can tomato paste
- 3/4 cup dark corn syrup
- 3/4 cup any soda pop (we like coke or ginger ale)
- 1/4 cup cider vinegar
- 2 Tbsp Worcestershire sauce
- 1 Tbsp "sweet baby rays" sauce
Melt the butter in a small saucepan set over low heat. Add the green onions and garlic and cook for
2 to 3 minutes, until the green pieces of the green onion are well wilted. Stir
in the tomato paste, followed by the corn syrup, soda pop, vinegar,
Worcestershire sauce, and Sweet baby rays sauce. Blend well and
simmer, stirring occasionally, reduce for 20-30 minutes or until pleasantly
thick.
Tuesday, June 25, 2013
Cowboy Dutch Oven Potatoes
Ingredients:

Preparation:
Cut the bacon slices into 1-inch pieces. Cut the onion into rings about 1/2 inch thick and separate the rings. Scrub the potato skins clean, leave the peel on them. Slice the potatoes into uniform circle slices about 1/4 inch thick. In a large bowl, combine the potatoes and onions and let soak in cold water until ready to use.
Heat a 12-inch standard dutch oven over warm fire or 15 - 20 briquettes until it just barely starts to smoke. Add the chopped bacon and cook and stir until the bacon is crisp, but not burnt. Drain water from potatoes and onions, then add them to the dutch oven and stir well to combine and distribute the bacon and bacon drippings evenly throughout the mixture, season with salt and pepper. Cover and bake over medium fire or with 10 briquettes bottom heat and 15 briquettes top heat for 40 to 60 minutes - stirring occasionally until potatoes are fully cooked but not falling apart. Stir so that the bottom doesn't burn

- 1 lb bacon
- 1 large yellow onion
- 5 lbs potatoes
- 1 teaspoon salt
- 1/2 tsp fresh-ground black pepper
Preparation:
Cut the bacon slices into 1-inch pieces. Cut the onion into rings about 1/2 inch thick and separate the rings. Scrub the potato skins clean, leave the peel on them. Slice the potatoes into uniform circle slices about 1/4 inch thick. In a large bowl, combine the potatoes and onions and let soak in cold water until ready to use.
Heat a 12-inch standard dutch oven over warm fire or 15 - 20 briquettes until it just barely starts to smoke. Add the chopped bacon and cook and stir until the bacon is crisp, but not burnt. Drain water from potatoes and onions, then add them to the dutch oven and stir well to combine and distribute the bacon and bacon drippings evenly throughout the mixture, season with salt and pepper. Cover and bake over medium fire or with 10 briquettes bottom heat and 15 briquettes top heat for 40 to 60 minutes - stirring occasionally until potatoes are fully cooked but not falling apart. Stir so that the bottom doesn't burn
Tuesday, May 21, 2013
Heaven in a Crockpot
Every once in awhile we try a new recipe... straight as the recipe reads, no alteration or changing it up... and when that happens and it turns out really really good, we love to give credit where credit it due! So, my I suggest a little "Heaven in a Crockpot"

1 box Betty Crocker fudge brownie mix
1/2 cup butter, melted.
4 eggs
1 pouch Betty Crocker chocolate chip cookie mix
Mix it all together.
Cook about 3 hours on low.
Top with vanilla ice cream.
For more great tips and recipes just Friend Request David N Bonnie Luper Facebook.

1 box Betty Crocker fudge brownie mix
1/2 cup butter, melted.
4 eggs
1 pouch Betty Crocker chocolate chip cookie mix
Mix it all together.
Cook about 3 hours on low.
Top with vanilla ice cream.
For more great tips and recipes just Friend Request David N Bonnie Luper Facebook.
Wednesday, May 15, 2013
Caribbean Chocolate Chip Cookies

Ingredients
- 1/2 cup butter, softened
- 3/4 cup dark brown sugar
- 1 large egg
- 1 teaspoon vanilla extract
- 1 teaspoon pineapple juice
- 1/2 cups fresh coconut shredded
- 2 cups all-purpose flour
- 1/2 teaspoon baking soda
- 1/4 teaspoon salt
- 1/2 cup chopped white chocolate
- 1/2 cup sliced almonds
Preparation
- 1. Beat butter and sugar at medium speed with an electric mixer 2 minutes or until light and fluffy. Add egg, beating until smooth, stopping to scrape down sides as needed. Stir in vanilla and pineapple juice.
- 2. Stir together flour, baking soda, and salt. Gradually add to butter mixture, beating at low speed until blended. Stir in coconut, white chocolate and almonds into batter. Drop by rounded tablespoonfuls 2 inches apart on lightly greased or parchment paper-lined baking sheets. Bake, in batches, at 350° for 10 to 12 minutes. Let cool completely on wire racks.
Saturday, May 4, 2013
Cinco de Mayo Fiesta Cake
Ingredients:


- Chocolate Cake
- 2 1/2 cups all-purpose flour
- 2 cups sugar
- 1 teaspoon baking soda
- 1/4 teaspoon salt
- 1/3 teaspoon cinnamon
- 1 cup butter
- 1/3 cup unsweetened cocoa powder
- 2 eggs
- 1/2 cup buttermilk
- 1/2 cup blanco Queso melted
- 1/2 cup water
- 1 teaspoons vanilla
- Chocolate Frosting:
- 1/4 cup butter
- 3 tablespoons unsweetened cocoa
- 4 tablespoons buttermilk
- 2 to 2 1/2 cups sifted confectioners' sugar
- 1/2 teaspoon vanilla
- 1/2 cup chopped pecans, optional
Preparation:
CakeGrease and flour a 15X10X1-inch cookie sheet pan or jelly roll pan and set aside
In a large bowl, combine flour, sugar, baking soda, cinnamon and salt; set aside.
In a medium saucepan combine 1 cup butter, 1/3 cup cocoa, 1/2 cup melted queso and 1/2 cup of water. Bring mixture to a boil, stirring constantly. Remove from heat. With an electric hand-held mixer on medium speed, beat chocolate mixture into the dry mixture until thoroughly blended. Add eggs, 1/2 cup of buttermilk, and 1 1/2 teaspoons of vanilla. Beat for 1 minute (batter will be thin). Pour batter into the prepared pan.
Bake in a 350° oven about 22 to 25 minutes for the 15X10-inch pan or about 30 to 35 minutes for the 13X9-inch pan, or until a wooden pick or cake tester inserted in center comes out clean.
While cake is still hot make the frosting, Pour warm chocolate frosting over the warm cake, spreading evenly. Place cake in pan on a wire rack; cool thoroughly before cutting.
Makes 24 servings.
Frosting:
In a medium saucepan combine 1/4 cup butter, 3 tablespoons unsweetened cocoa powder, and 3 tablespoons buttermilk. Bring to a boil, stirring, over medium heat. Remove from heat; add 2 cups confectioners' sugar and 1/2 teaspoon vanilla. Beat until smooth. Add more confectioners' sugar or a little milk or more buttermilk, if needed, for a spreadable frosting. If desired, stir in 1/2 cup coarsely chopped pecans. Spread the warm frosting over the cake.
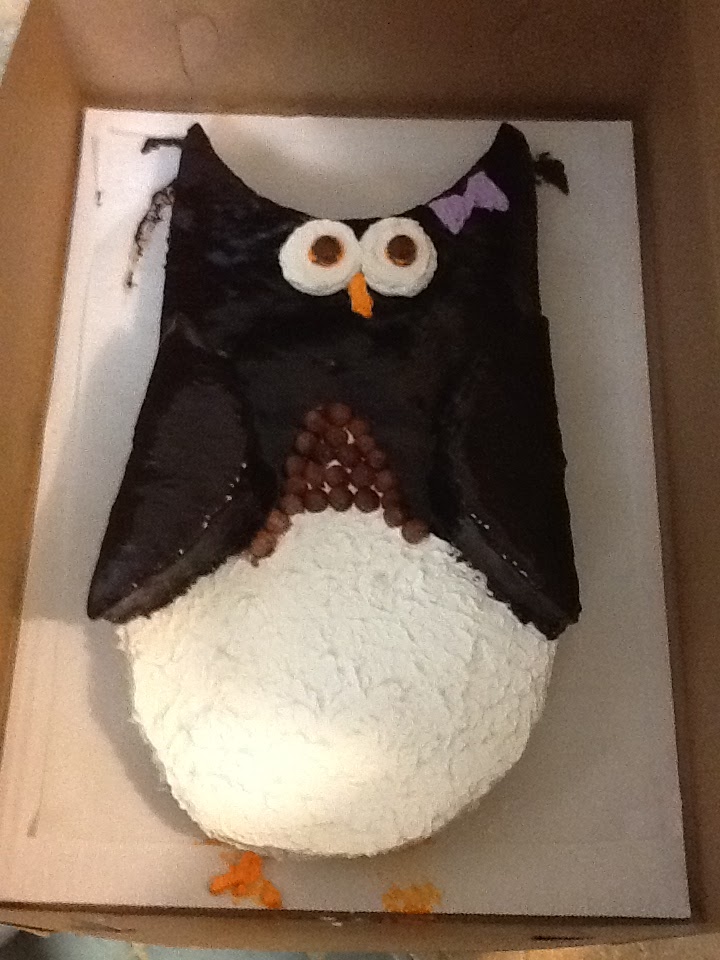
Monday, February 11, 2013
Happy Birthday to Kalee...
We celebrated Kalee's Birthday today.... She loves owls, so this is the cake we made for her. The cake her favorite Funfetti.

Saturday, February 2, 2013
Super Saturday - "How to Measure Dry & Liquid Ingredients"
Often in teaching our boys at home we have found ourselves, using or being referred to a "YouTube" clip. So we thought it only fitting that we start out our Super Saturday Cooking School by starting at the basics... with a couple of YouTube Videos for you on "How to Measure Dry & Liquid Ingredients"
You can also see a great video with more details at Kraft.com in the Cooking School section.
You can also see a great video with more details at Kraft.com in the Cooking School section.
Monday, January 28, 2013
Make-Over Monday ....Oh What A Craving!!!
All week I have been craving Spinach and Artichoke dip. And... still in the spirit of trying to lose some more weight I decide that I could have my "Cake and eat it too" so to speak... I took my favorite Spinach & Artichoke Dip recipe and with a little help from Kraft, I re-worked it to make it low-cal... IT WAS AWESOME!
So I am sending you, with love, our new and approved...
So I am sending you, with love, our new and approved...
Awesome Spinach & Artichoke Dip ~ Made Over


1 can (14 oz.) artichoke hearts, drained, finely chopped
|
1 pkg. (10 oz.) frozen chopped spinach, thawed, drained
|
3/4 cup Grated Parmesan Cheese
|
3/4 cup Light Mayonnaise
|
1/2 cup Shredded Reduced Fat Mozzarella Cheese
|
1/2 tsp. garlic powder
|
This recipe can be served cold or hot...
For warm dip, PREHEAT oven to 350°F. Mix all ingredients until well blended. |
SPOON into 9-inch pie plate or quiche dish.
|
BAKE 20 min. or until heated through. Serve with Your Favorite Reduced Fat Crackers and assorted cut-up fresh vegetables.
Makeover Savings Keep the creamy, cheesy flavor of this popular dip by combining Parmesan and mozzarella cheese in place of 2 cups of mozzarella cheese, and using 3/4 cup KRAFT Mayo Light Mayonnaise. These simple tweaks will save 50 calories and 5.5 grams of fat per serving compared to the traditional recipe For even a more Low-Cal Variation - Awesome Spinach and Mushroom Dip Substitute 1 cup chopped fresh mushrooms instead the artichoke hearts. MY ORIGINAL RECIPE CAN BE FOUND AS THE POST ON DECEMBER 21, 2011. |
Tuesday, January 22, 2013
"Tuesday's with Dorie"... French Apple Tart

I love the layered look to this dessert, which seems to be very common among the apple tart style dishes. This recipe is very similar to another dessert we baked back in January 2010. So I got to wondering about the history of this layered dessert and this is what I discovered...
The story begins in the late 1800’s in a small town in the Loire valley, Franch. Where two sisters, both unmarried, ran a small hotel. Caroline Tatin, the youngest, was sought out by many of her friends for her confidential advice on affairs of the heart. The older sister, Stéphanie Tatin, took care of all the cooking and she could be found at any time of day working at the stove with her big copper pots and kettles. She became known for her specialty, "tarte aux pommes", the traditional French apple pie, which she served crunchy and caramelized, with warm melted sugar and butter.
The story goes, that one day when she was preparing lunch in a bit of a hurry, by mistake she put the apples and sugar in the pan without putting the crust in first. In a rush she threw the crust on top, baked it a bit too long, then turned it out on a plate, upside down, not bothering to let it cool as she usually did. Voila! the delicious tarte tatin was born. But the story doesn't end there... Maxim's, the famous Paris restaurant, got wind of the popularity of the tart, and engaged a chef to pose as a gardener for the sisters at their hotel and was assigned to steal the recipe. It has been on their menu ever since."
You can check out other great TWD recipes at "Tuesday's with Dorie". Come join the group and bake with us!
Saturday, January 19, 2013
Double Peanut Butter Chocolate Chip Cookies
Ingredients
- 1 cup sugar
- 1 cup packed brown sugar
- 1 cup butter, room temperature
- 1 cup crunchy peanut butter
- 2 egg
- 1 teaspoon Vanilla
- 2 1/2 cup flour
- 1 1/2 teaspoon baking soda
- 1 teaspoon baking powder
- 1/2 teaspoon salt
- 1/2 cup peanut butter chips
- 1/2 cup chocolate chips
Method
Cream the butter and sugars together until creamy. Blend in the peanut butter, vanilla and eggs. Mix together the dry ingredients - flour, baking soda, baking powder and salt. Stir the dry ingredients into the sugar mixture. Mix in Chocolate and Peanut Butter Chips.Preheat oven to 350°F. Shape dough into 1 1/4 inch balls. Place about 3 inches apart on ungreased cookie sheet. Bake until light brown, 9 to 10 minutes. Cool on baking sheets for a minute; transfer to rack to cool completely.
For chewier cookies, bake at 300°F for 15 minutes. Also dough can be chilled and reserved for later use. We bake half and roll half of the dough and freeze it. It makes a quick and yummy Family Home Evening Treat.
Thursday, January 17, 2013
Winter Party Salad --- TTC #3

Fill large serving bowl half full of Spring Mix Salad mix and add 1 head Romain lettuce chopped.
1 can pink grapefruit (well drained),
1-2 cups red onion, carrots, cucumber and celery (sliced)
1/8 cup sunflower seeds or pine nuts,
1/4 cup raisins
1 cup cherry tomatoes
1 handful of rice noddles
*homemade balsamic vinaigrette (recipe below)
To assemble the salad, I place everything in a large bowl, put
on the lid and shake to coat all lettuce with the dressing. Then serve
on plate or in a salad bowl.
Ingredients for homemade balsamic vinaigrette
- 3 Tbsp extra virgin olive oil
- 1 Tbsp Balsamic Vinegar
- 1-2 Tbsp white wine or water
- 2 Tbsp honey mustard
- 1/4 tsp sea salt
- 1/4 tsp black pepper
Instructions
- Place all ingredients into a small jar. Anything with a lid works well.
- Shake to mix thoroughly. Stores in fridge for 1-2 week
Tuesday, January 15, 2013
P.F. Chang's Chicken Lettuce Wraps!
These are so good... A great version of P.F. Chang's Chicken Lettuce Wraps! The recipe is from Todd Wilbur and Top Secret Recipes
Ingredients
- 3 tablespoons oil
- 2 boneless skinless chicken breasts ( I used pork)
- 1 cup water chestnuts
- 2/3 cup mushrooms
- 3 tablespoons chopped onions
- 1 teaspoon minced garlic
- 4 -5 leaves iceberg lettuce
- 1/4 cup sugar
- 1/2 cup water
- 2 tablespoons soy sauce
- 2 tablespoons rice wine vinegar
- 2 tablespoons ketchup
- 1 tablespoon lemon juice
- 1/8 teaspoon sesame oil
- 1 tablespoon hot mustard
- 2 teaspoons water
- 1 -2 teaspoon garlic and red chile paste
- 2 tablespoons soy sauce
- 2 tablespoons brown sugar
- 1/2 teaspoon rice wine vinegar

Special Sauce
Stir Fry Sauce
Directions
- Make the special sauce by dissolving the sugar in water in a small bowl.
- Add soy sauce, rice wine vinegar, ketchup, lemon juice and sesame oil
- Mix well and refrigerate this sauce until you're ready to serve.
- Combine the hot water with the hot mustard and set this aside as well.
- Eventually add your desired measurement of mustard and garlic chili sauce to the special sauce mixture to pour over the wraps.
- Bring oil to high heat in a wok or large frying pan.
- Saute chicken breasts for 4 to 5 minutes per side or done.
- Remove chicken from the pan and cool.
- Keep oil in the pan, keep hot.
- As chicken cools mince water chestnuts and mushrooms to about the size of small peas.
- Prepare the stir fry sauce by mixing the soy sauce, brown sugar, and rice vinegar together in a small bowl.
- When chicken is cool, mince it as the mushrooms and water chestnuts are.
- With the pan still on high heat, add another Tbsp of vegetable oil.
- Add chicken, garlic, onions, water chestnuts and mushrooms to the pan.
- Add the stir fry sauce to the pan and saute the mixture for a couple minutes then serve it in the lettuce"cups".
- Top with"Special Sauce".
Thursday, January 10, 2013
Cucumber Club Lettuce Wrap --- TTC #2
I am trying very hard to lose some more weight and I see wraps listed on lots of diet plans. I am not fond of a large grouping of cold ingredients rolled up in a cold dry tortilla. Then I came acrossed these one day at Kraft and thought I would give them a try....They are very Tasty!
2 pieces leaf lettuce
 2 slices smoked ham
1/4 cup chopped cucumber
1/4 cup chopped tomato
1/4 cup chopped celery
2 tsp. KRAFT Light Ranch Reduced Fat Dressing
TOP lettuce leaves evenly with ham, cucumber and tomato.
Drizzle with dressing.
Cucumber Club Lettuce Wrap
(Prep Time:5 min * Total Time:5 min * Makes:1 serving, 2 wraps)2 pieces leaf lettuce
2 slices smoked ham1/4 cup chopped tomato
1/4 cup chopped celery
2 tsp. KRAFT Light Ranch Reduced Fat Dressing
TOP lettuce leaves evenly with ham, cucumber and tomato.
Drizzle with dressing.
ROLL up burrito style.
SERVE immediately or wrap tightly in plastic wrap and refrigerate until ready to serve.
*Side Note: My son made his with crispy chicken tenders instead of the ham and they were very tasty, just higher in calorie count.
SERVE immediately or wrap tightly in plastic wrap and refrigerate until ready to serve.
*Side Note: My son made his with crispy chicken tenders instead of the ham and they were very tasty, just higher in calorie count.
Tuesday, January 8, 2013
"Tuesday's with Dorie"... Pizza with Onion Confit

I definitely will be making this again. We had a lot of Confit left over and I added it (cold) to my crispy chicken wrap the next day, it was really good too!
You can check out other great TWD recipes at "Tuesday's with Dorie". Come join the group and bake with us!
Subscribe to:
Posts (Atom)